We will be outlaying the Procurement process starting from Purchase Requisition to Invoice receipt.
The process flow for this tutorial would be in the following order
Purchase Requisition(PR) > Request For Quotation(RFQ) > Purchase Order(PO)
Purchase Requisition
In this tutorial we will be designing a purchase requisition workflow that can be used by anyone in the organization to request purchase of goods/services. The tutorial includes the following
- Purchase requisition object data model design
- Purchase requisition workflow design
- Purchase requisition report design
Purchase Requisition Object data model design
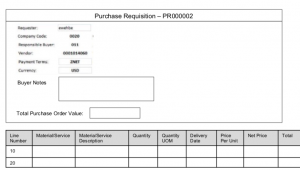
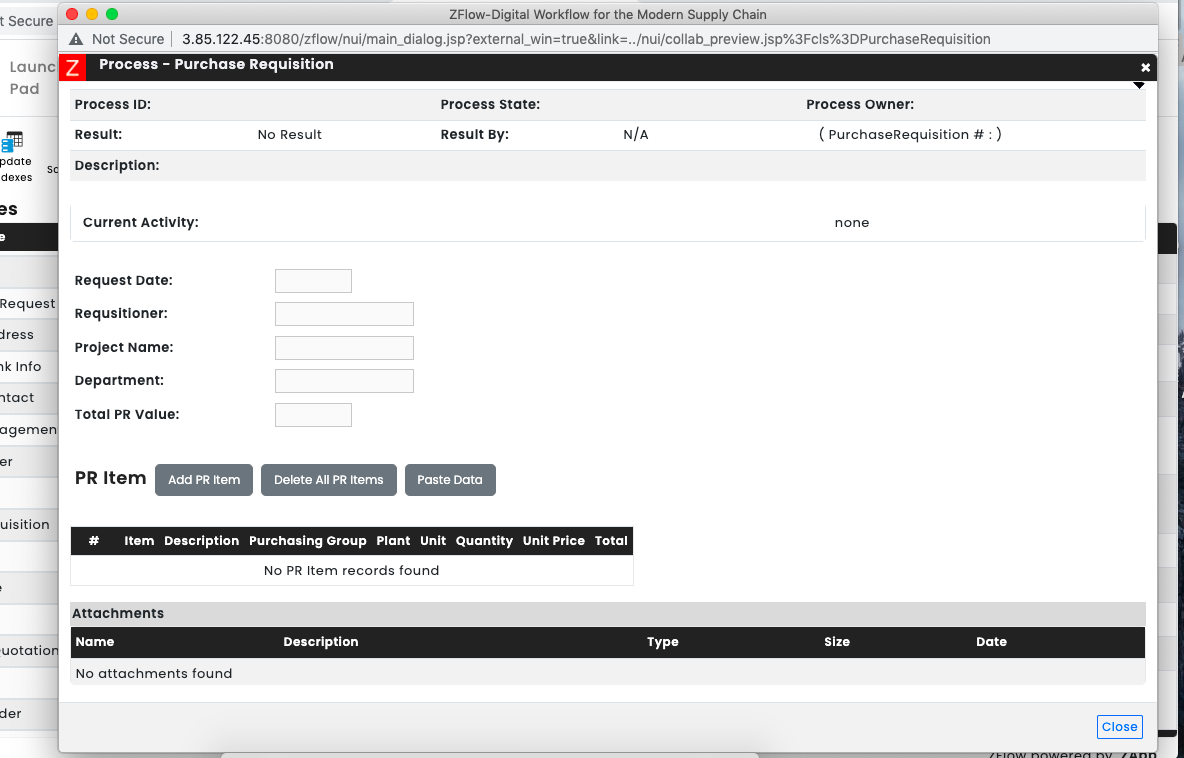
In this section of the tutorial we will first design the Purchase Requisition Class. The purchase requisition object will be designed based on the form below
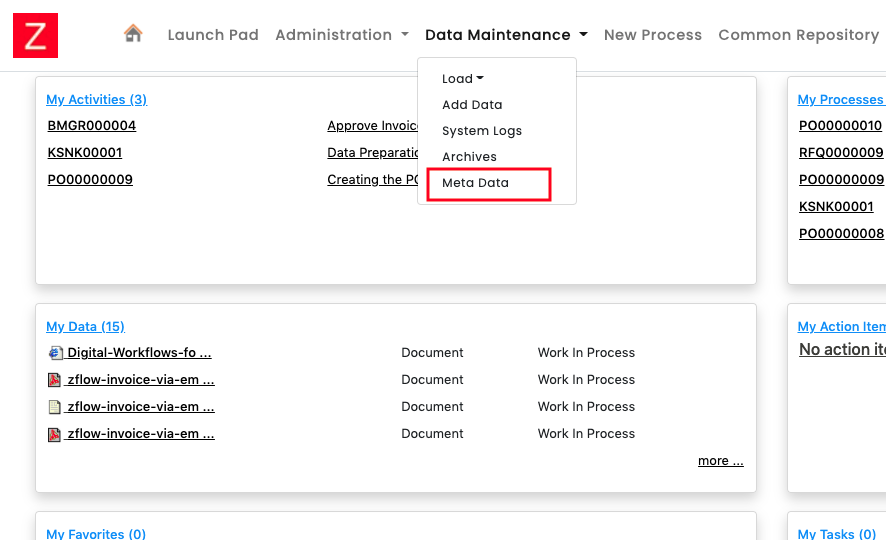
The first task to create the Purchase Requisition class using the metadata editor
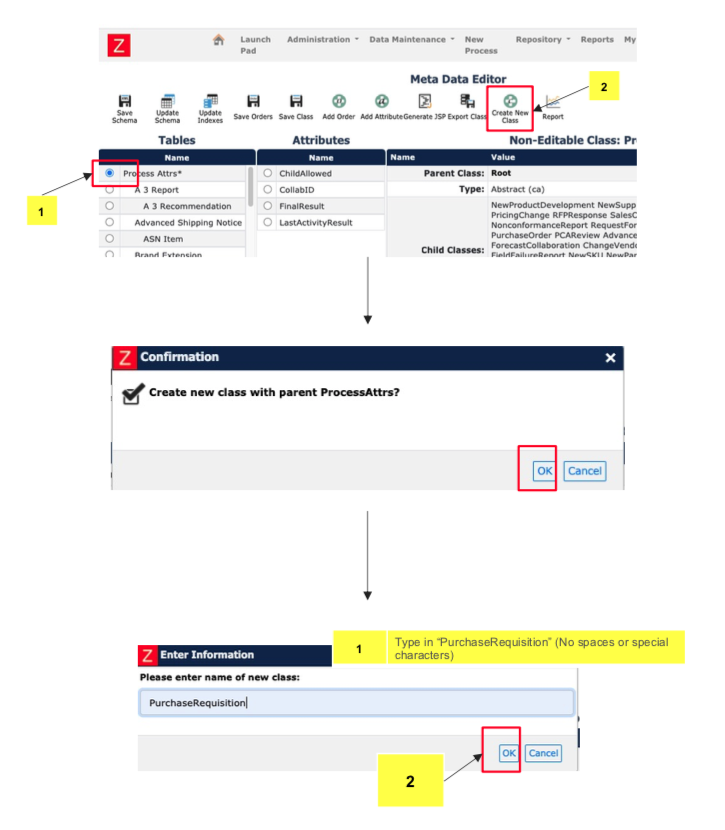
The Purchase Requisition class be use created as a child of “Process Attrs” class as shown below. Process Attrs is the parent class of all processes. Any class that is created as a child of Process Attrs can be used for designing processes
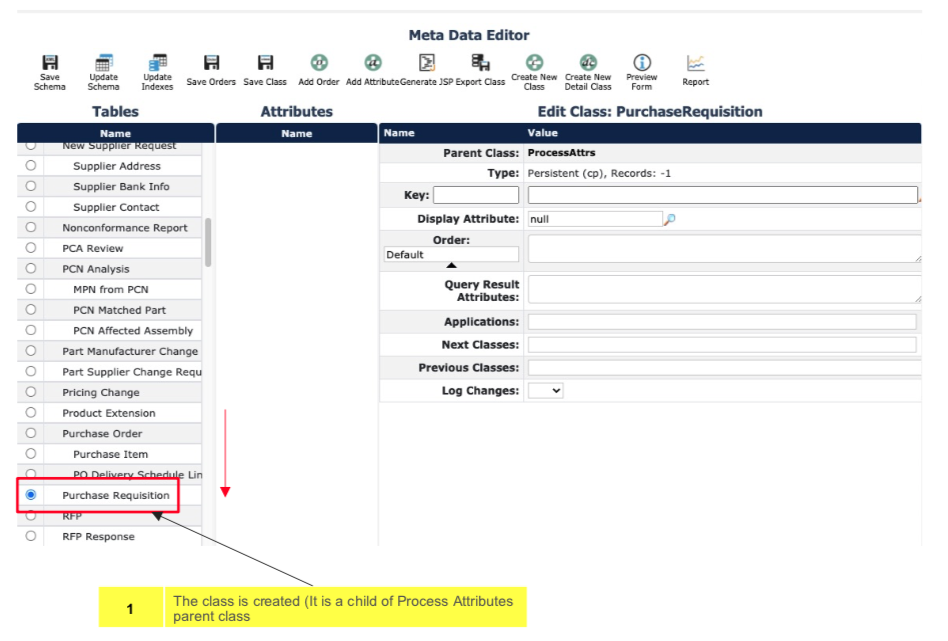
The Purchase Requisition class is created as a child of Process Attrs
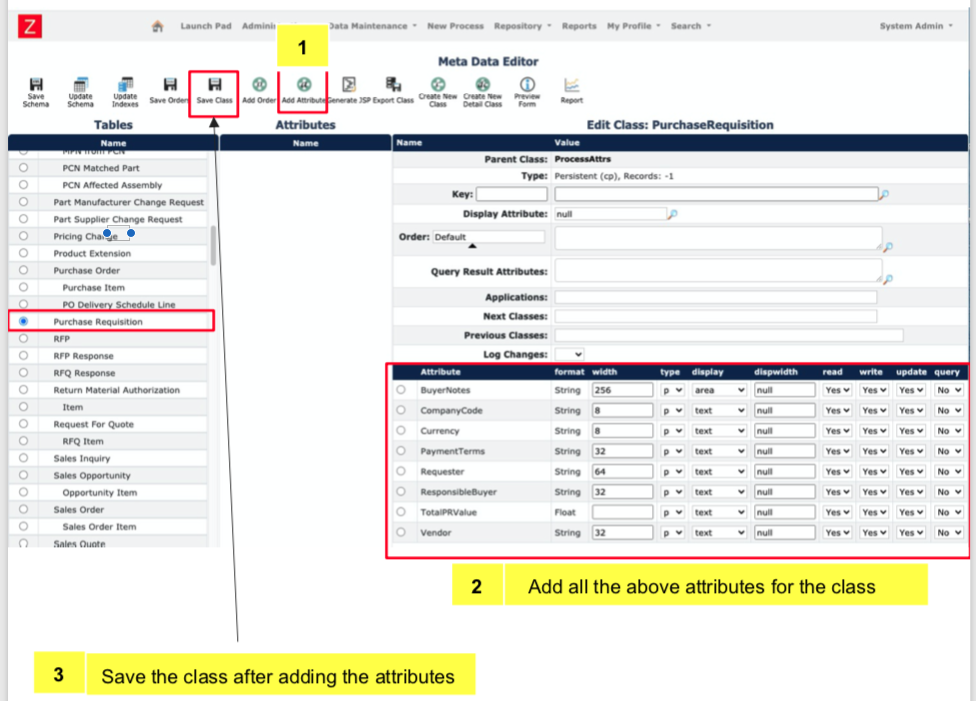
Once the class is defined add the attributes as shown below and save the class
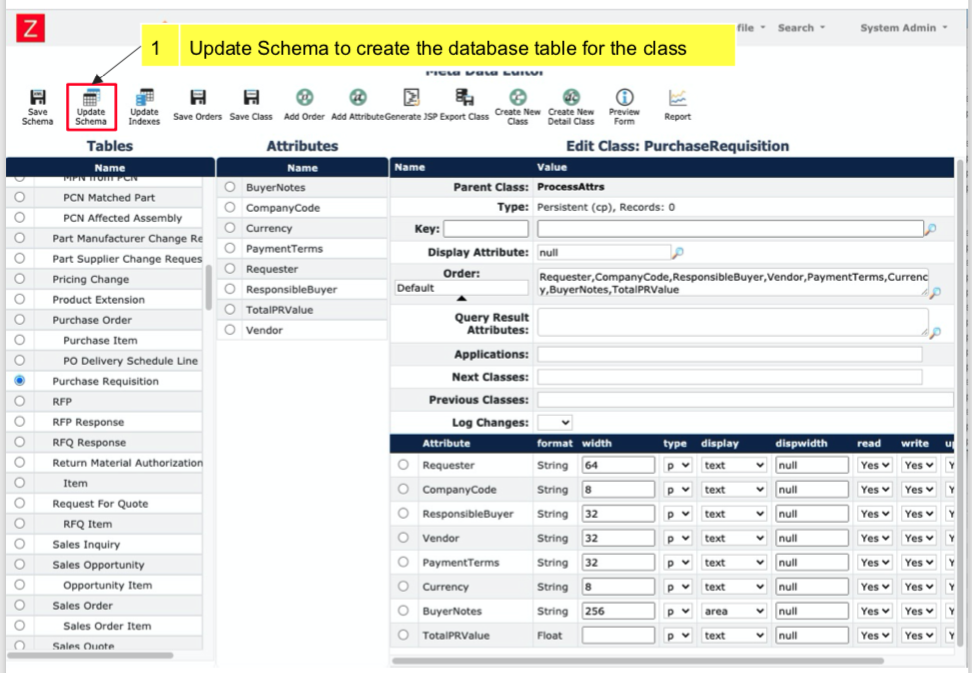
Now that the class is defined we can create the database table that supports the class definition
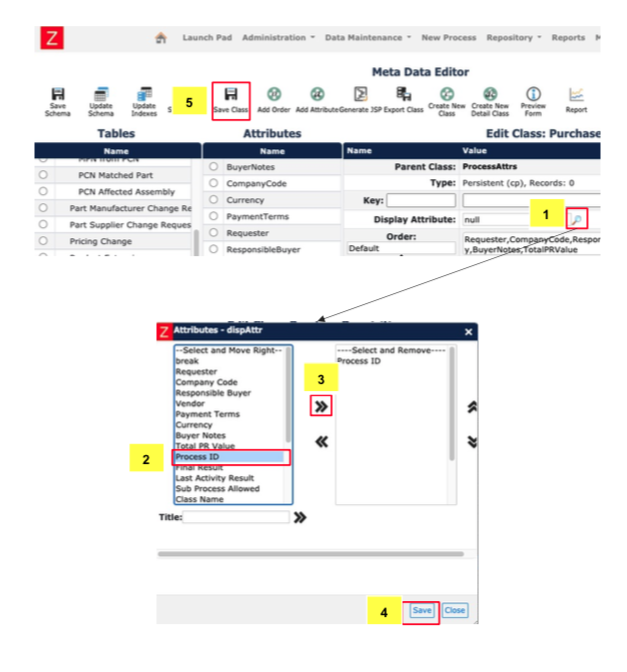
The next step Is to set up display attributes
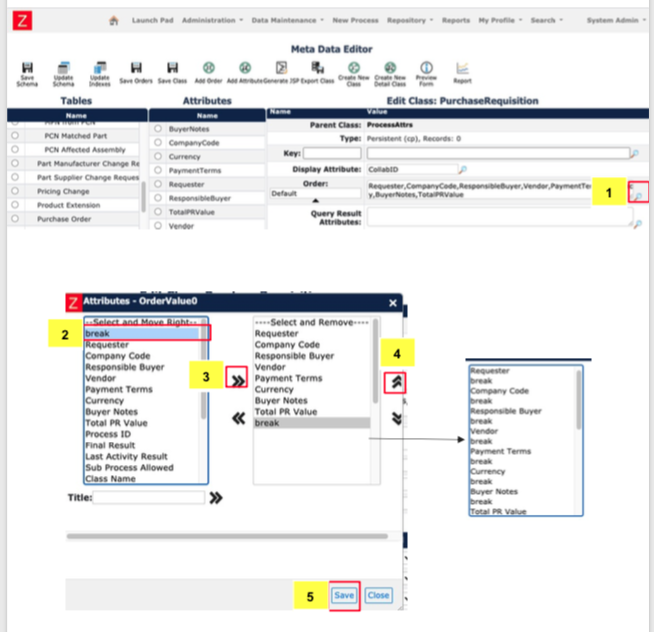
Next we’ll set up the Orders. The attributes set here will be displayed on the form for the process.
Using break between attributes to leave a single line of space between form columns.
You can preview the forms or add orders to the forms by selecting the options as shown

Form preview:
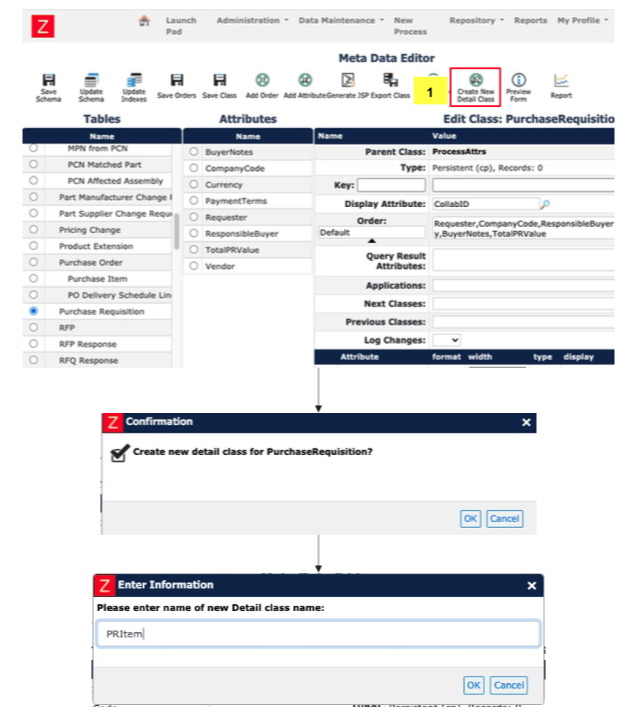
The next step is to create a detail class for the Purchase Requisition. The detail class allows us to create Purchase Requisition line items for the Purchase Requisition
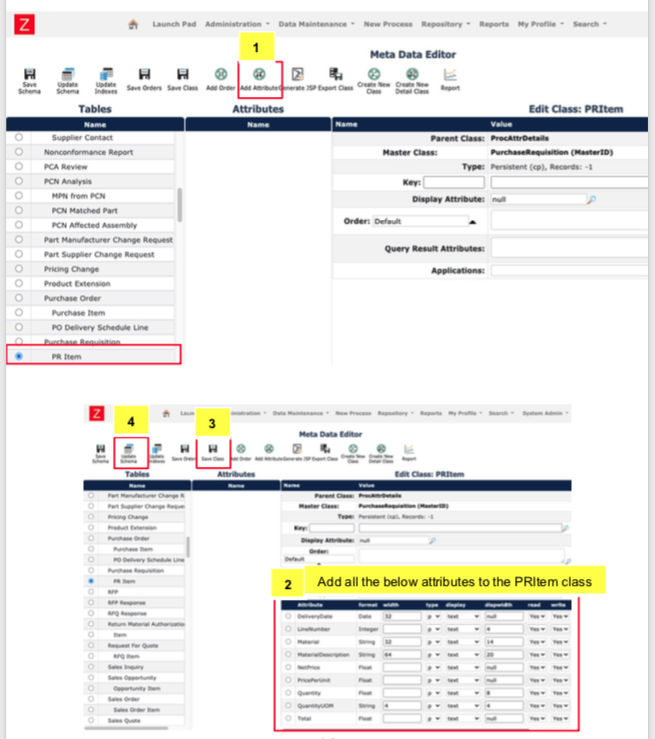
Add attributes to the PRItem class
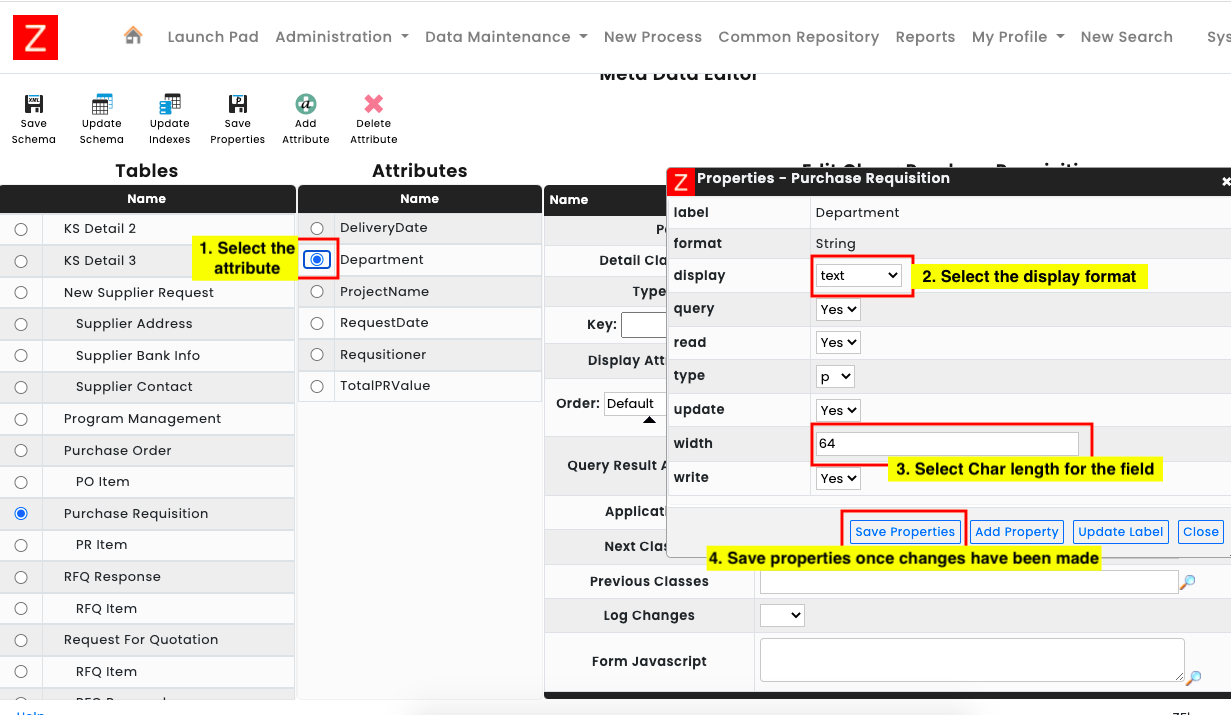
The format for the attributes can be set by selecting the attribute using the drop down list and selecting the desired format of appearance. One can also select the char length of the field.
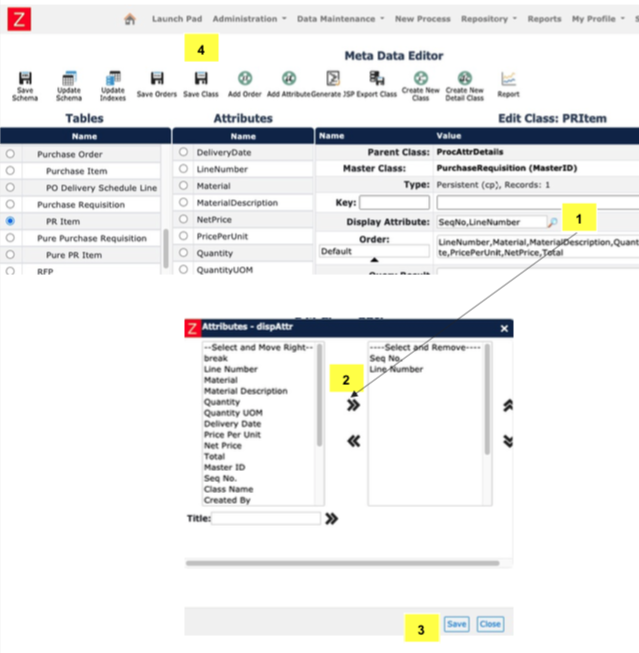
In this step we will select the attributes for Display Attribute. Display Attribute(s) are important for detailed classes as they determine the sort order in which they will be listed in the form.
Purchase requisition workflow design
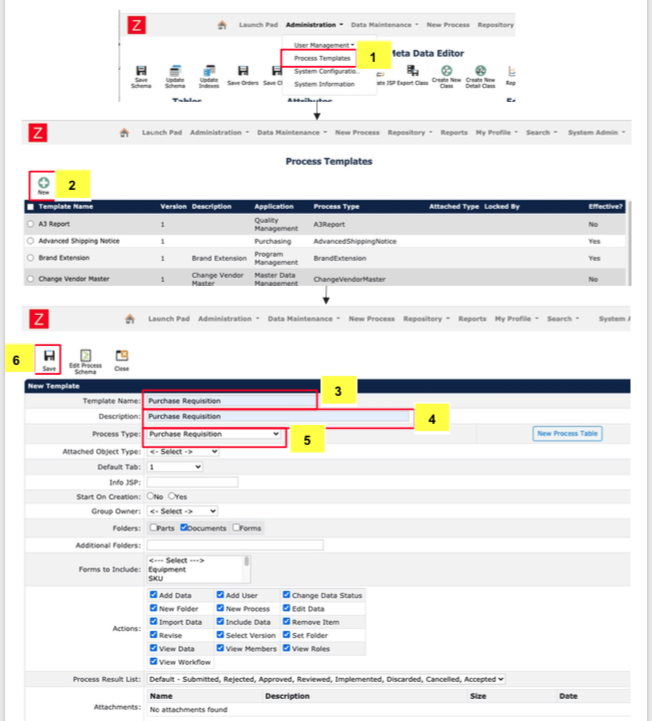
Now that the core class definition for Purchase Requisition process is finished we can start with the workflow template creation.
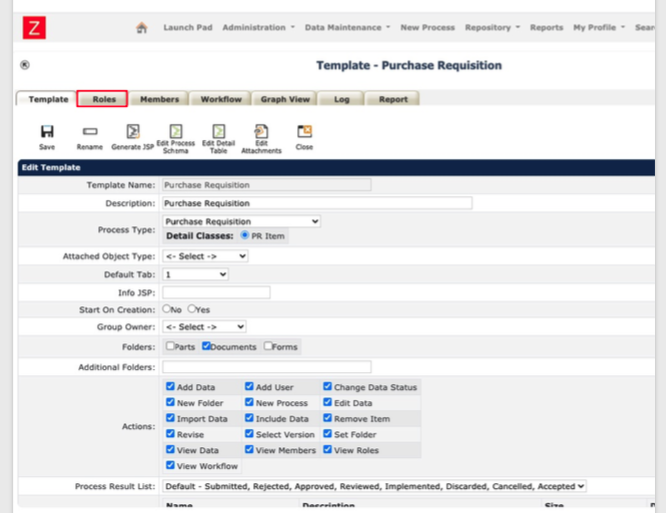
Select the roles tab so that we can define the roles that will perform activities of the workflow
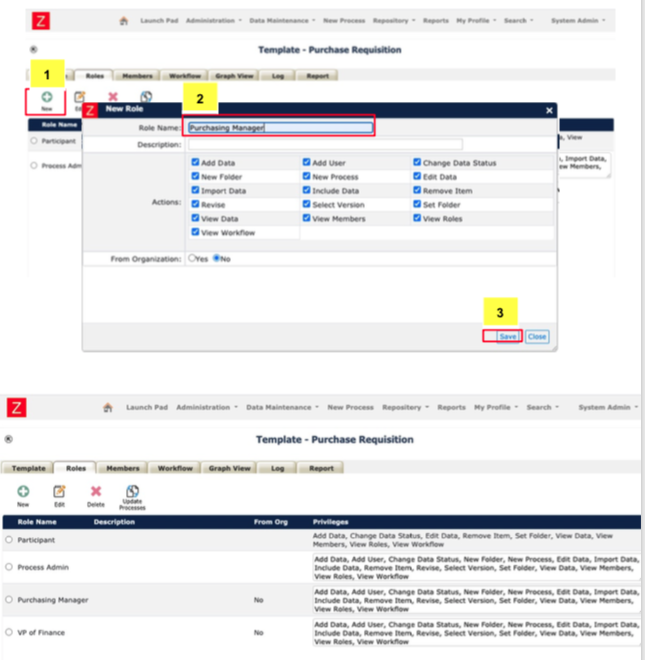
Complete the steps below to create 2 roles – Purchasing Manager and VP of Finance
The next step is to add members that will take on specific roles in the workflow
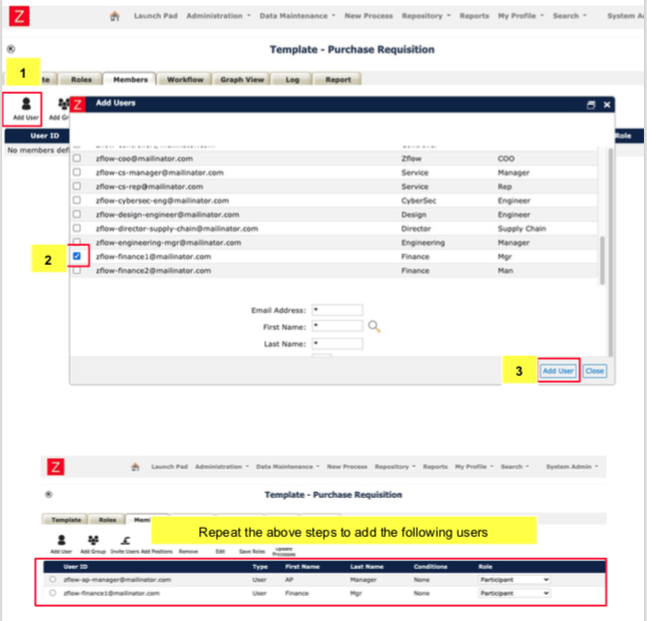
Assign process roles for the added users as shown in the steps below

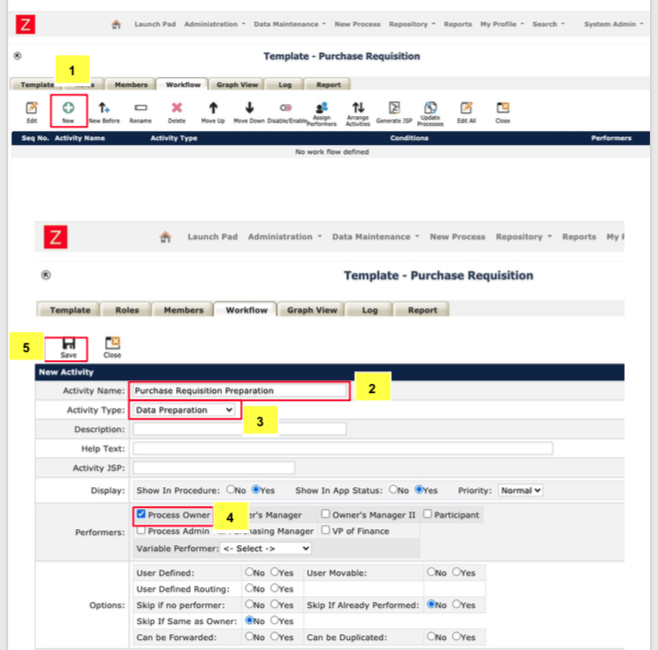
The next step is to add workflow activities for the Purchase Requisition process. Follow the steps below to add the first “Data Preparation” activity
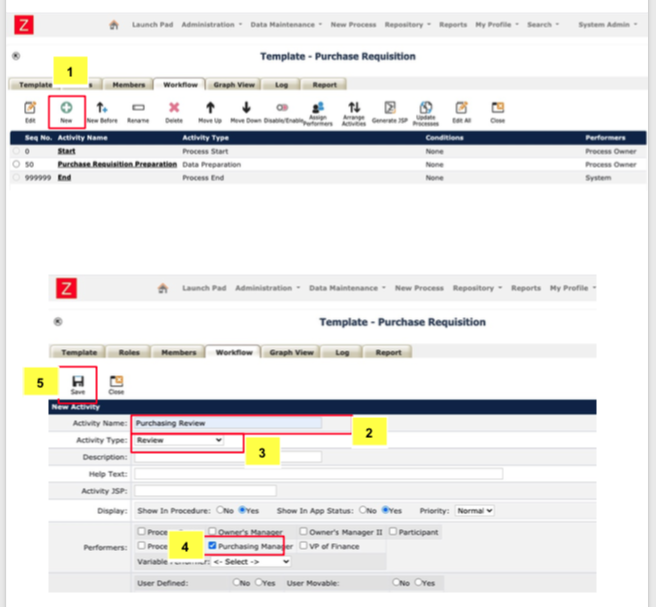
Repeat the steps below to add the “Purchasing Review” activity
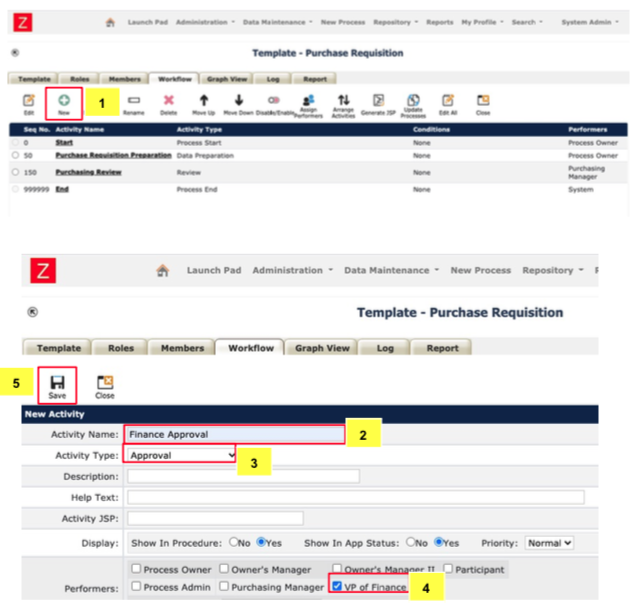
Repeat the steps below to add the “Finance Approval” activity
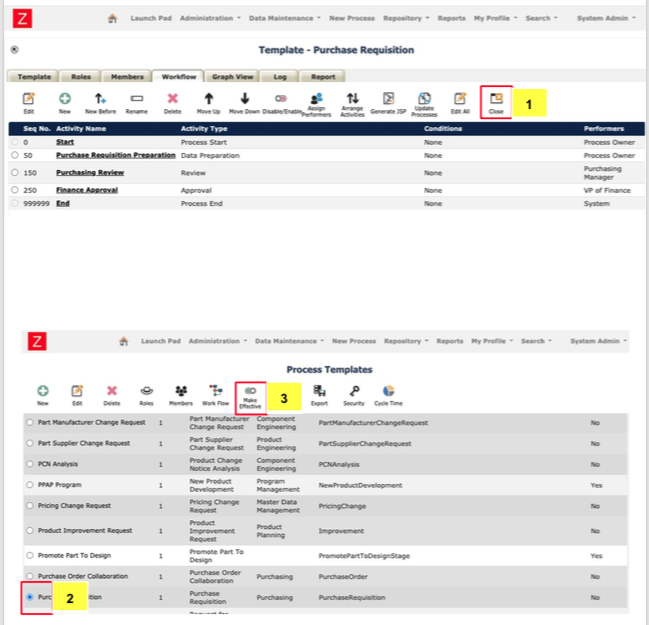
Now that the workflow definition is complete we can make the workflow effective so that everyone can instantiate the Purchase Requisition workflow
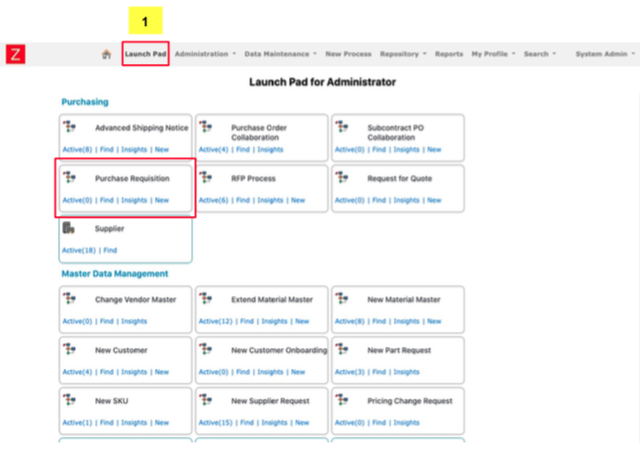
The Purchase Requisition workflow is now available in the Launchpad
Request For Quotation
The next step in the Procure-to-Pay Process Design – Tutorial will be the Request for Quotation process. In this tutorial we will be designing a Request for Quotation workflow that can be used by anyone in the organisation. The tutorial includes the following
- Request for Quotation object data model design
- Request for Quotation workflow design
Request for Quotation object data model design
In this section of the tutorial we will first design the Request for Quotation Class. The Request for Quotation object will be designed based on the form below
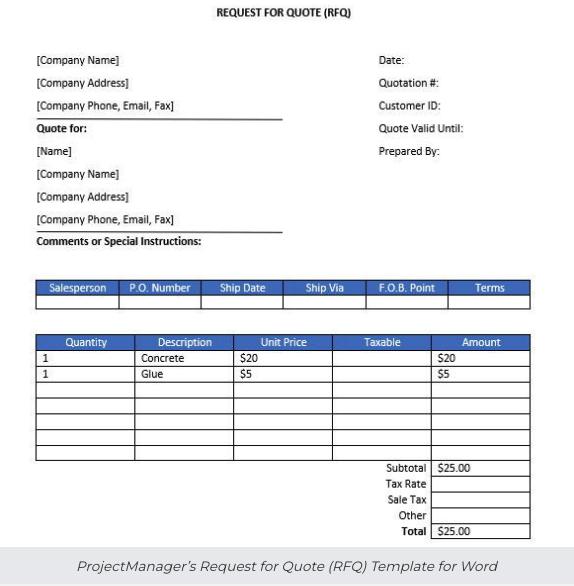
In order to create the Request for Quotation Class in the metadata editor, Refer to 1.1 on how to create a class under Parent “Process Attrs”
and it’s two subsequent detail classes which would be called
- RFQ Item and
- RFQ Responder
RFQ responder would be needed gauge the RFQ responses from suppliers and select the appropriate vendor.
The main RFQ class with parent would look like this
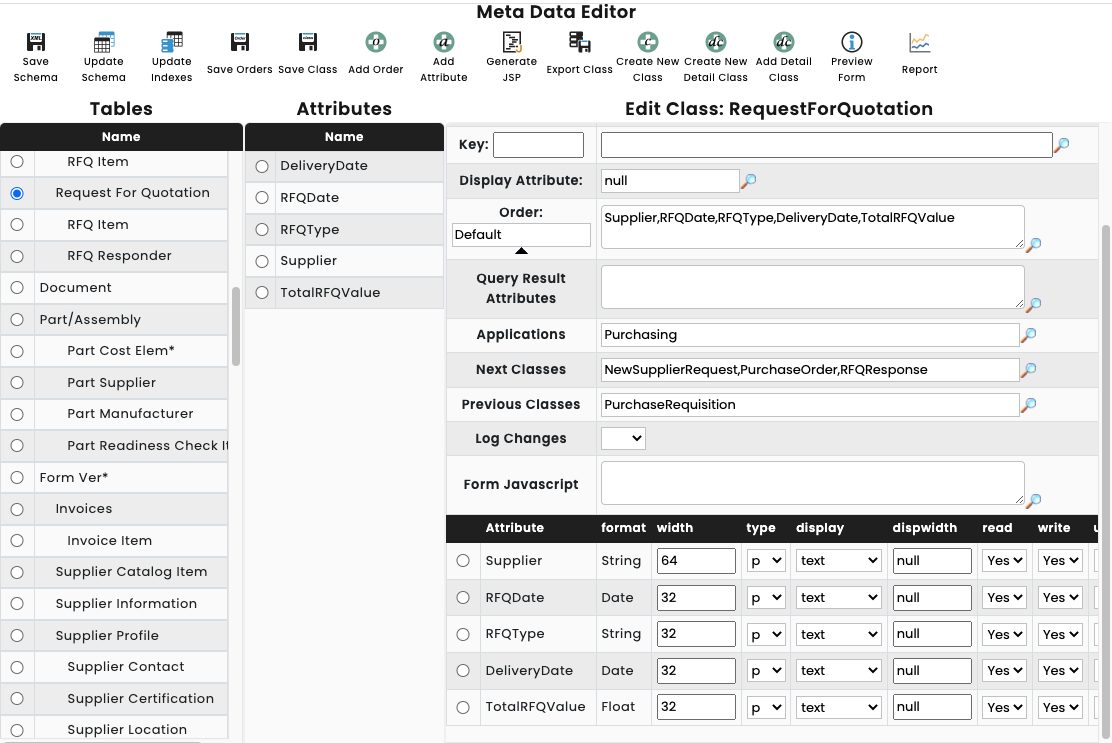
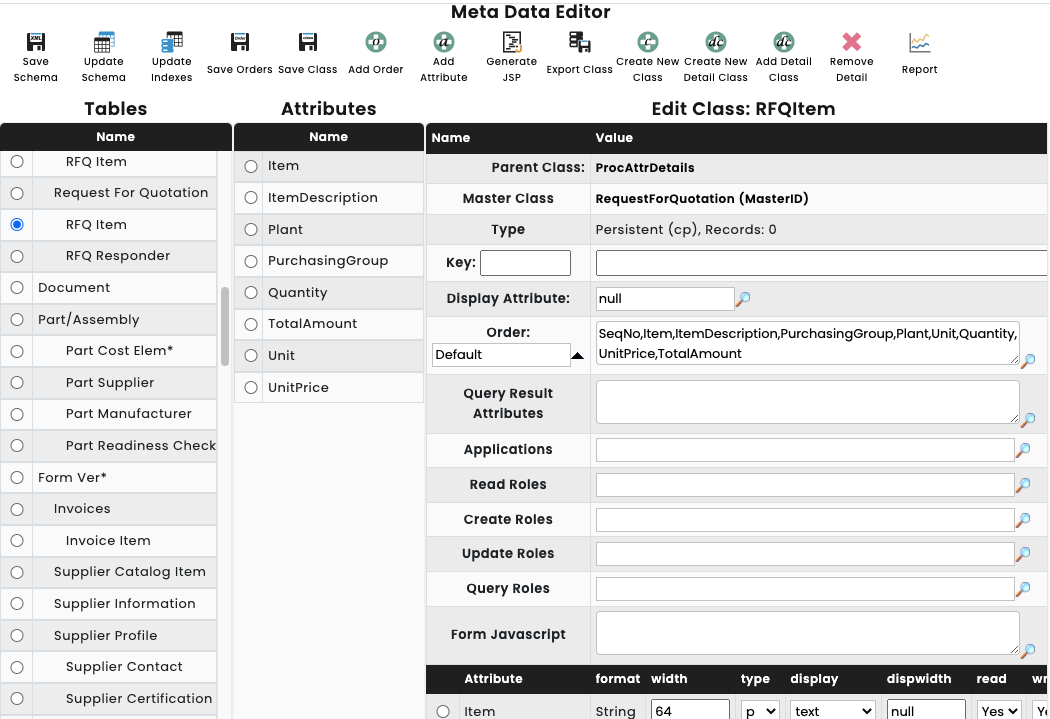
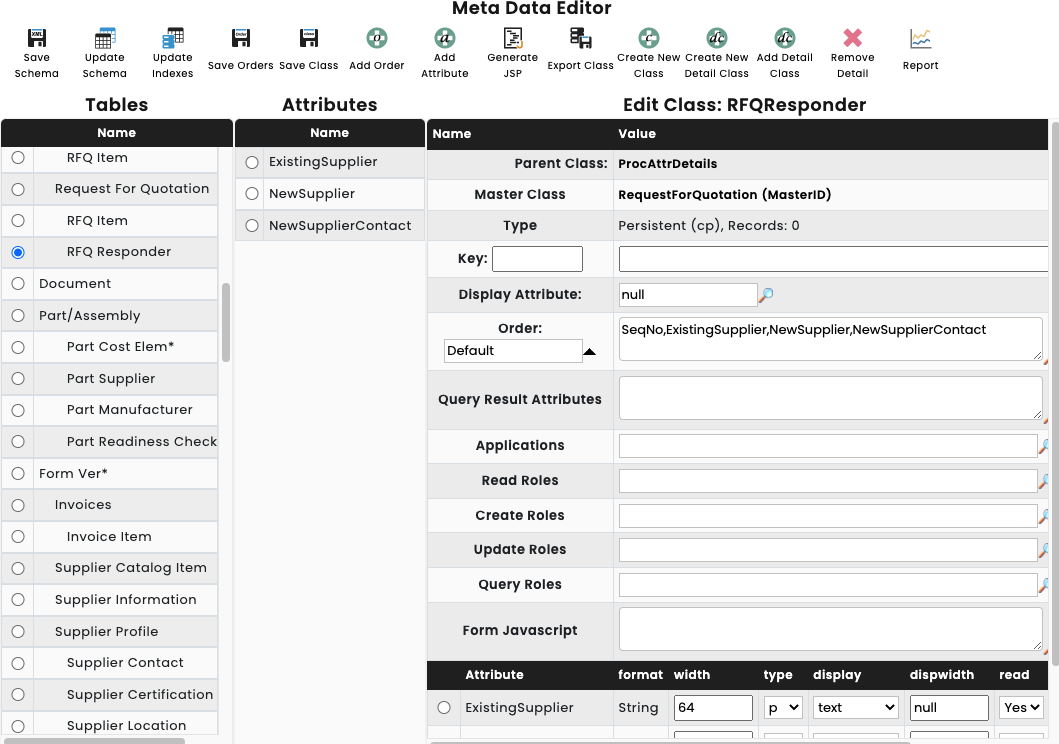
The detail classes, namely RFQ Item and RFQ responder would look like this:
RFQ Item
RFQ responder
Request For Quotation workflow design
Creating the template, adding roles and writing the workflow is similar to the Purchase Requisition process. Please see 1.2 for detailed instructions on how to do the same.
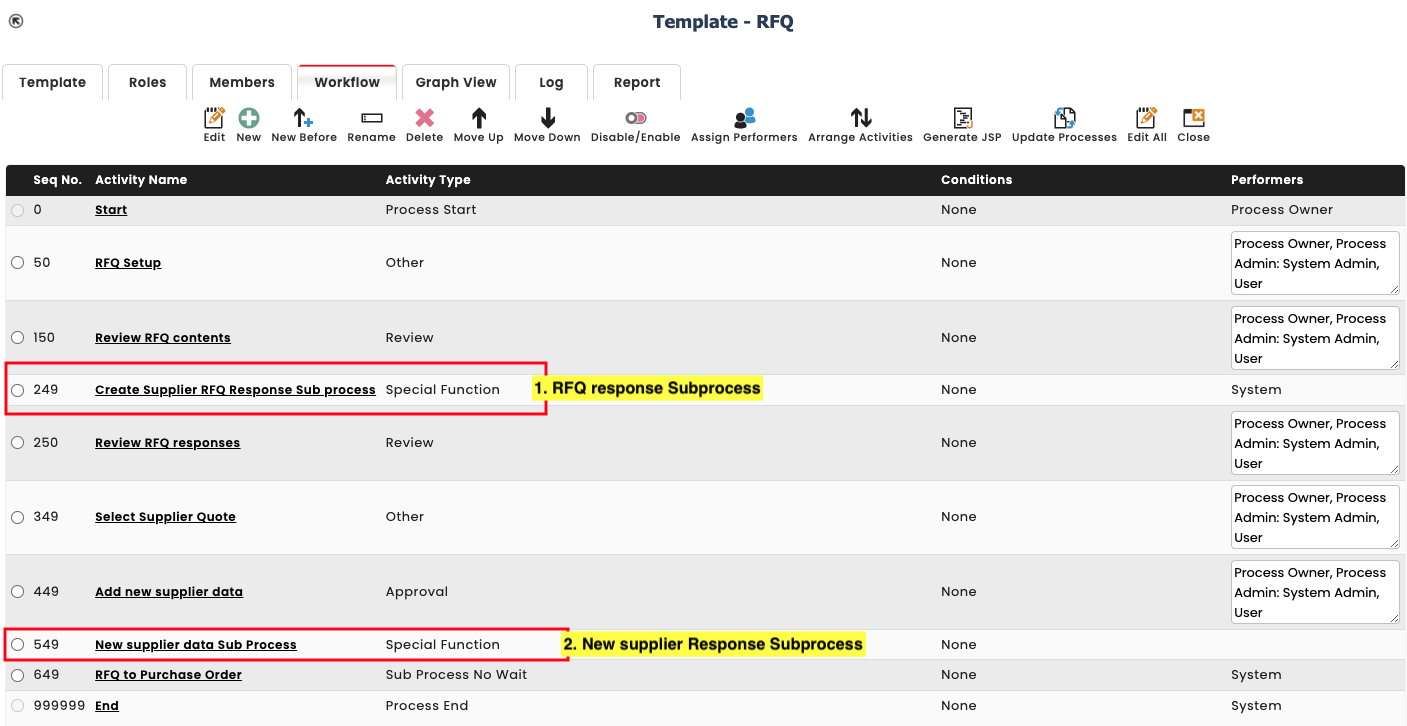
However here, we will have a few additional steps in the workflow design process. There will be 2 sub-processes here, namely RFQ Response and New supplier Request. (Both of which are separate classes. Will be detailed down below.)
- RFQ Response – This subprocess will be used to collate responses received from suppliers and select a supplier
- New Supplier Request – This will be used to add new supplier master data.
The main workflow for the RFQ process will look like this
RFQ Response ( Sub-process )
One of the steps in the Procure-to-Pay Process Design – Tutorial will be the RFQ Response process. The RFQ Response Process is not a standalone one but rather a subprocess to be used for RFQ.
RFQ Response Object data model design
The procedure for creating the Class under “ProcessAttrs” and it’s subsequent class RFQ Item is the same as the others can be viewed in a detailed manner at 1.1.
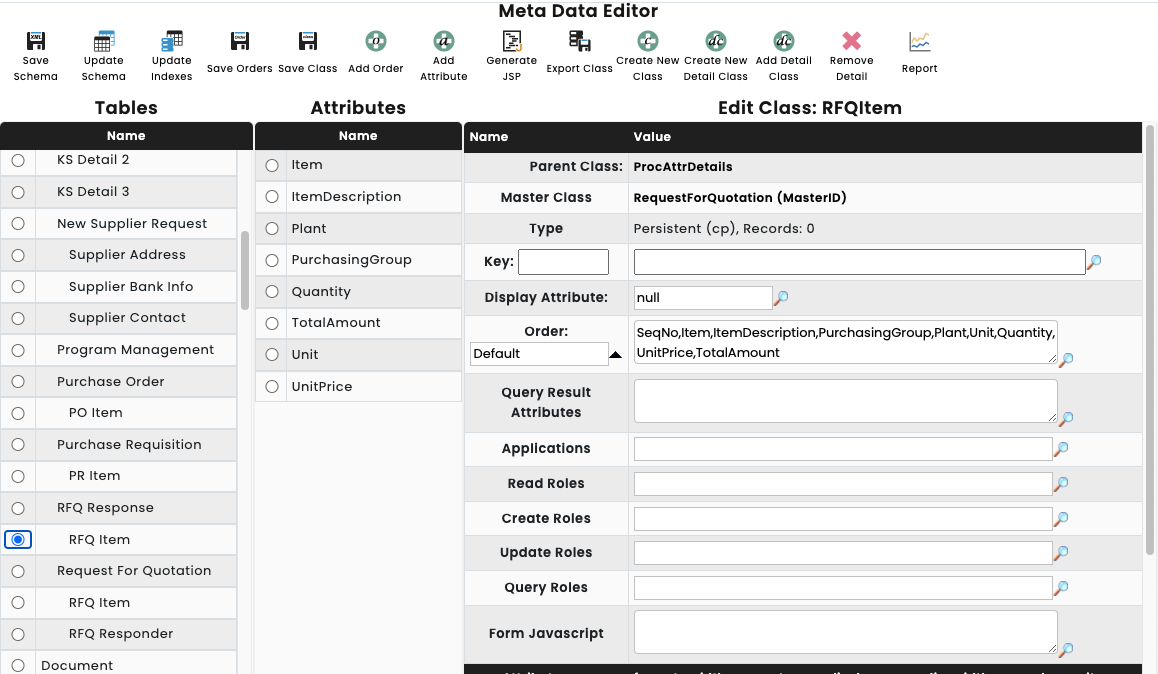
Important to know: RFQ Item detail class here is the same RFQ Item detail class used in RFQ. You can add it using

The metadata for the RFQ Response and it’s detail class would look like this:
RFQ Response
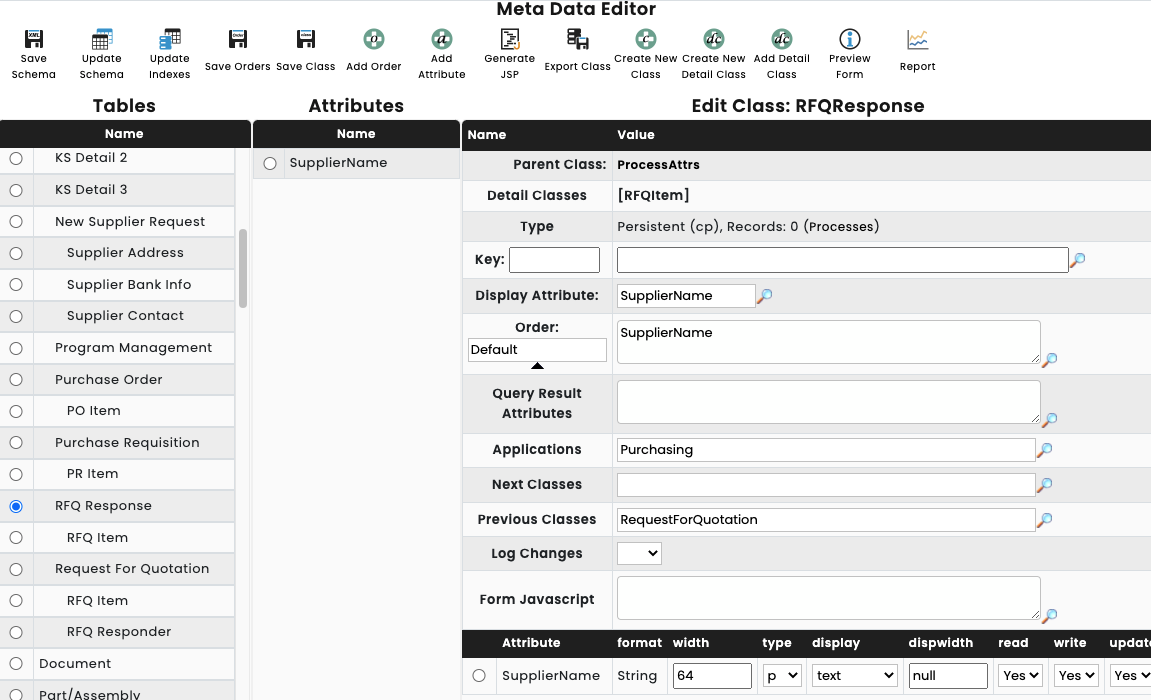
RFQ Item : Detail Class for RFQ Response
RFQ Response workflow design
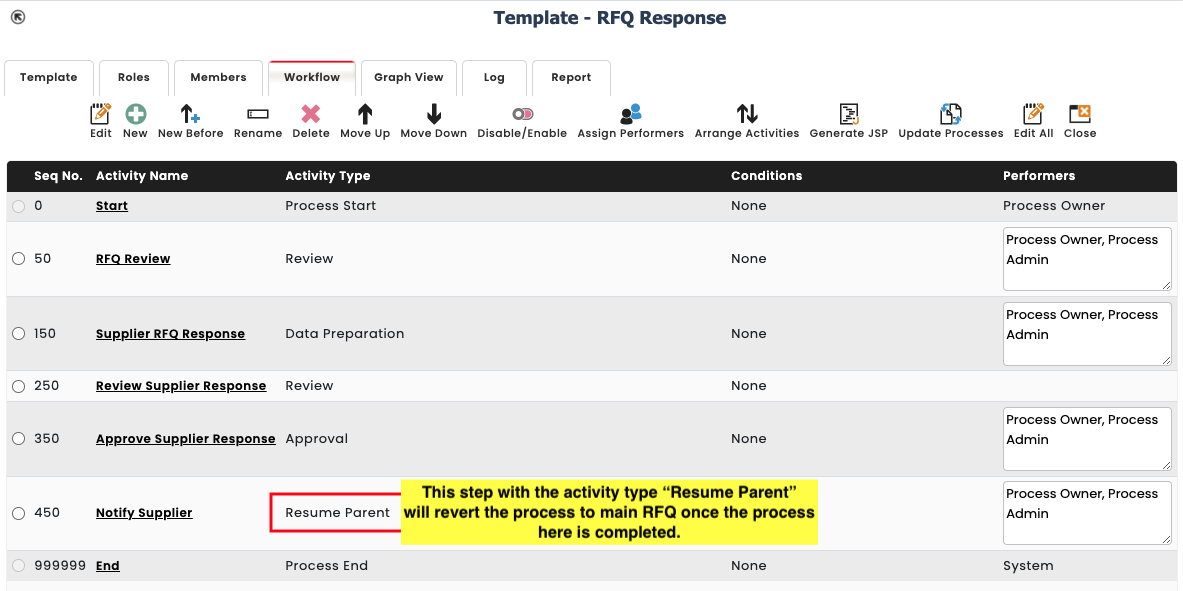
RFQ response is a subprocess to be used under Request for Quotation and will be used to collate Supplier Responses to the RFQ.
The workflow design is largely similar to RFQ and for detailed instructions on creating workflows, please refer to 1.1
The workflow design for RFQ response would look like this:
New Supplier Request ( Sub-process )
One of the steps in the Procure-to-Pay Process Design – Tutorial will be the New Supplier Request process. The New Supplier Request Process is not a standalone one but rather a subprocess to be used for RFQ.
This is to be used for adding New Supplier Master Data which is then fed into SAP.
New Supplier Request data model design
New Supplier Request workflow design
Purchase Order
The next step in the Procure-to-Pay Process Design – Tutorial will be the Purchase Order process. In this tutorial we will be designing a Purchase Order workflow that can be used by anyone in the organisation. The tutorial includes the following
- Purchase Order object data model design
- Purchase Order workflow design
Purchase Order object data model design
In this section of the tutorial we will first design the Purchase Order Class. The Purchase Order object will be designed based on the form below
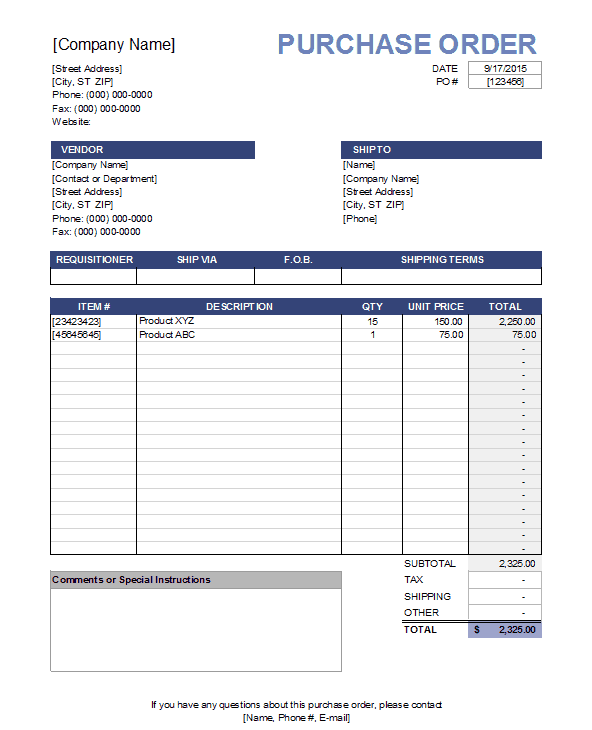
In order to create the Purchase Order Class in the metadata editor, Refer to 1.1 on how to create a class under Parent “Process Attrs”.
The purchase order class will have a detail class titled PO Item which will contains the Material data for the Items in the Purchase Order.
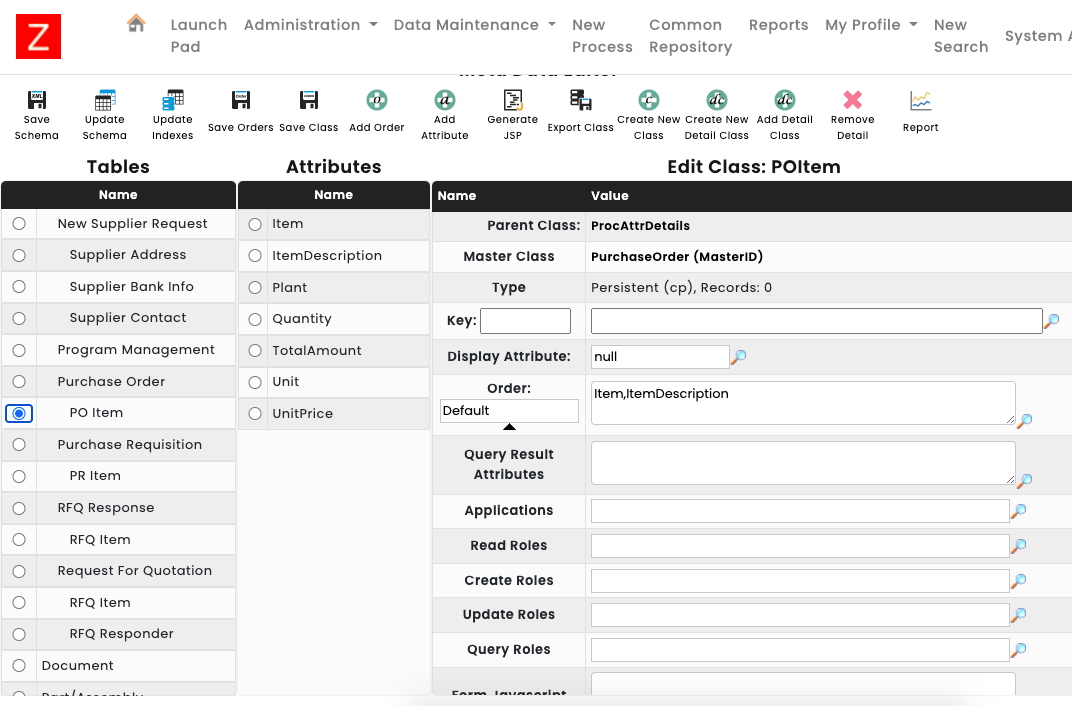
The metadata for the Purchase Order class:
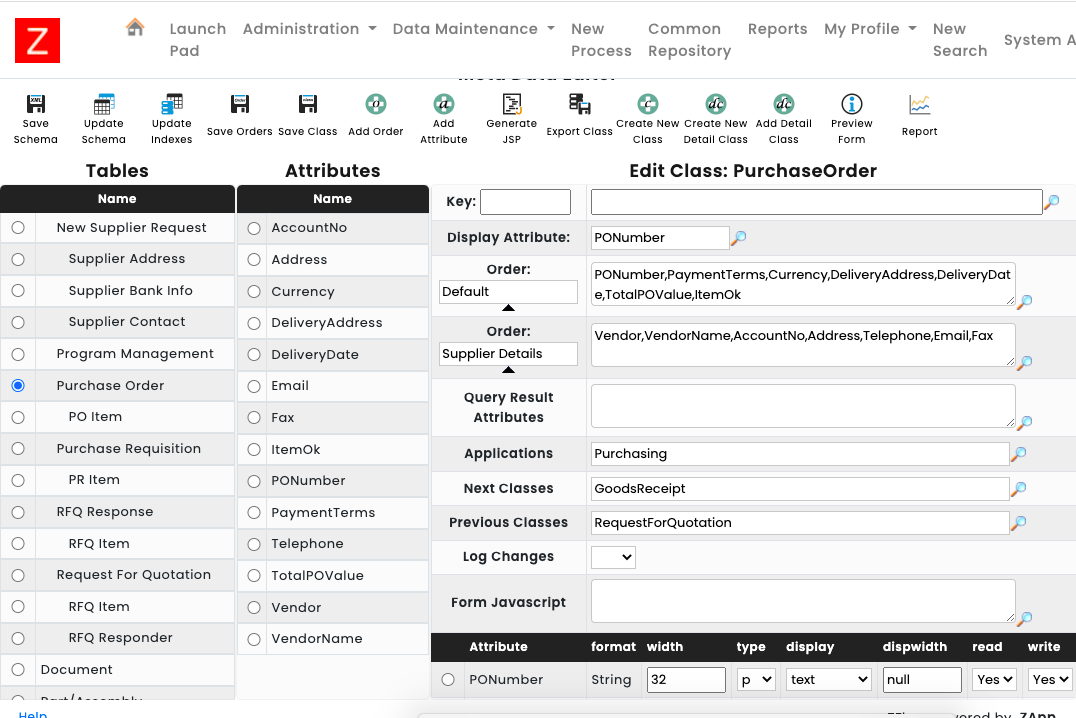
The metadata for the PO Item detail class:
Purchase Order workflow design
Creating the template, adding roles and writing the workflow is similar to the Purchase Requisition process. Please see 1.2 for detailed instructions on how to do the same.
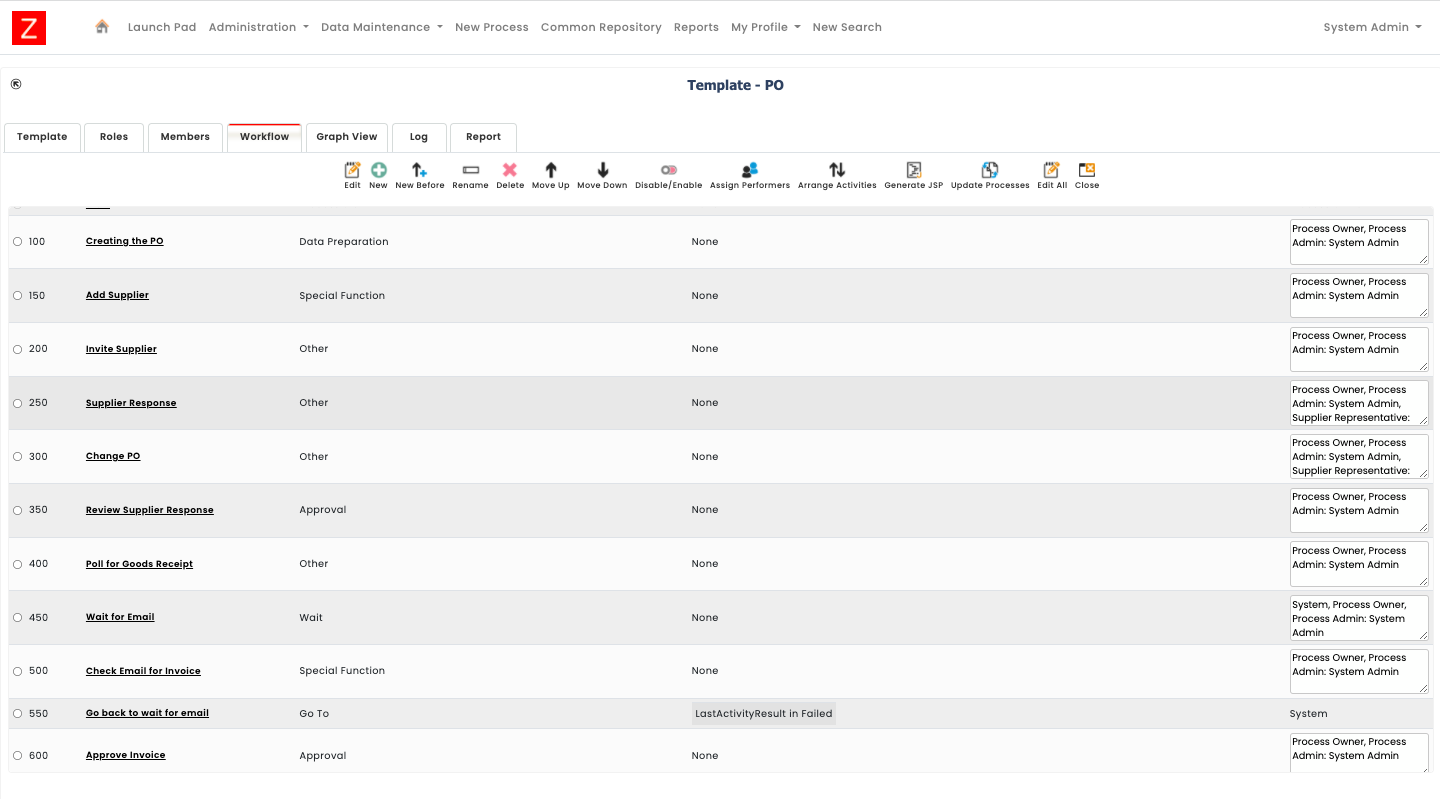
The overall view for the workflow would be like that displayed below:
Procure-to-Pay Process Specific steps
The Procure-to-Pay process requires the workflow to be in the following order
- Purchase Requisition
- Request for Quotation
- Purchase Order
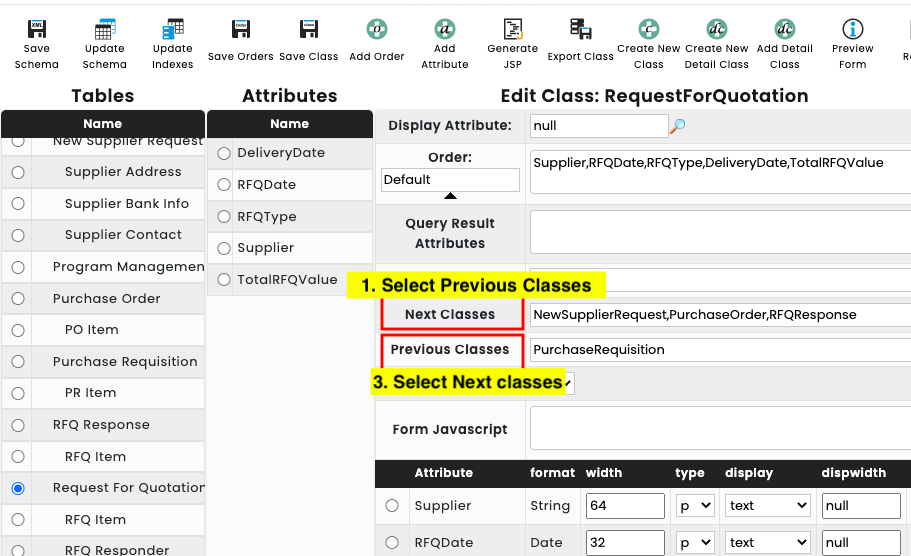
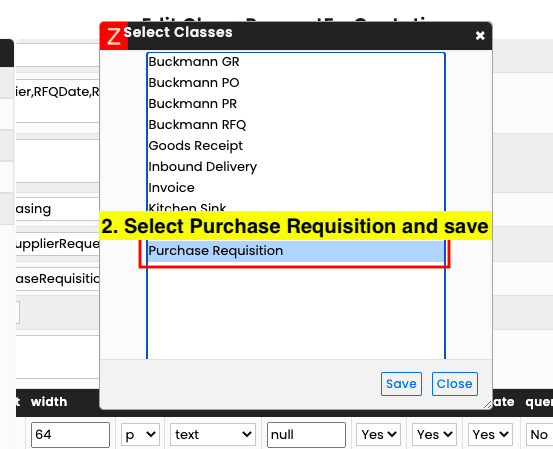
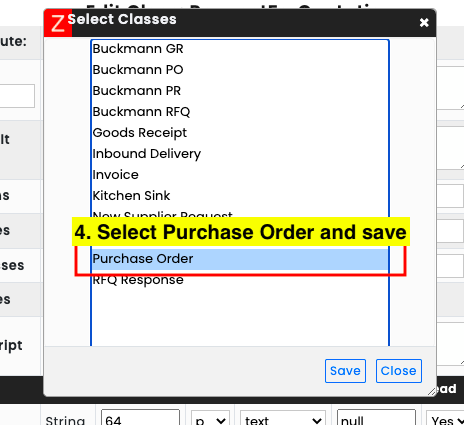
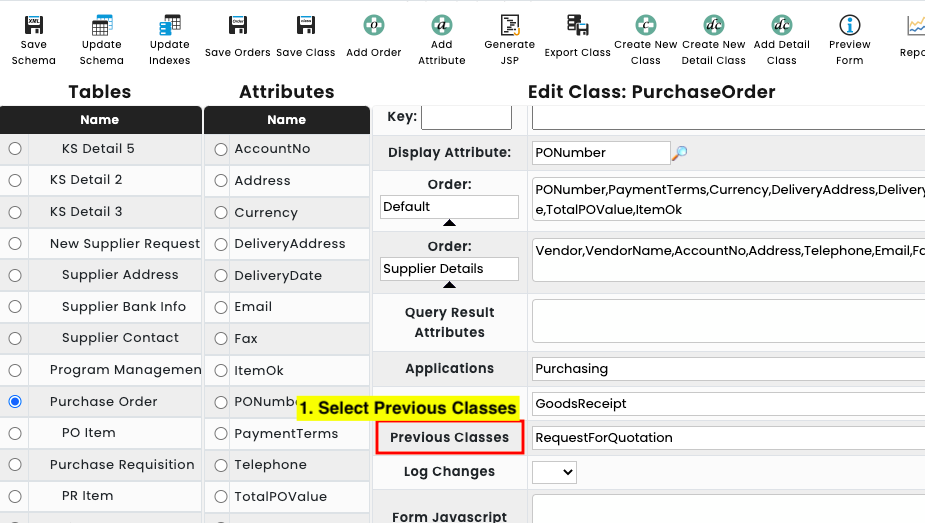
In order to ensure the process flow from start to finish, the 3 classes will need to linked together so that when a workflow is to be created for the Procure-to-Pay process, a new process would not have to be created at every step
i.e One would simply need to create a new purchase requisition and the workflow would finish at the last step of the Purchase order.
No new activity would be needed to created for each separate class.
A few steps would need to be undertaken in order to ensure that that process would take place.
Important to note that for this specific example we won’t be using the subprocess classes. Only the 2 main classes,
i.e PR’s, RFQ’s and PO’s would be used.
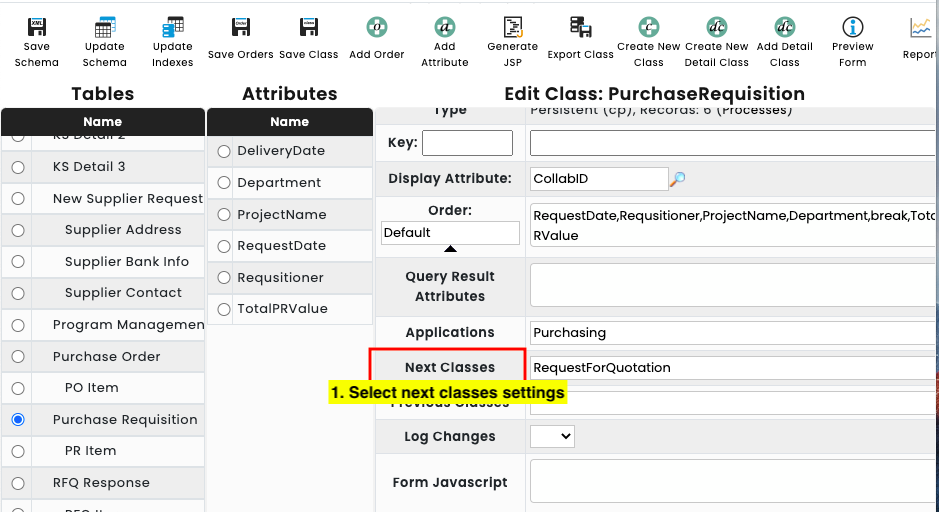
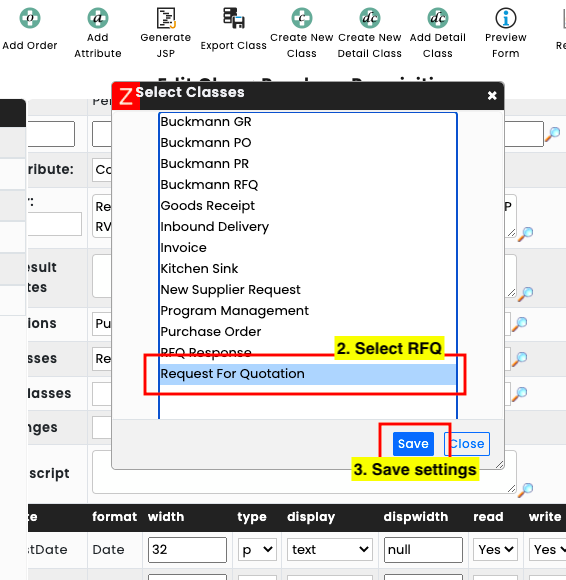
Procure-to-pay process metadata settings
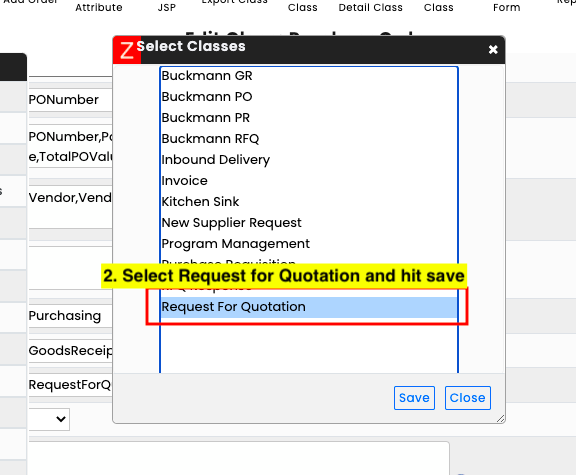
Procure-to-pay process Workflow Settings
The procure-to-pay process would need certain settings to be made in the workflow for each process so that the process will seamlessly take place from the first to the last step without our intervention i.e. In the following order
Purchase Req > Request for Quotation > Purchase order
1. Within the Purchase Req workflow, The last step of the workflow would need to be set to automatically create an RFQ process. This is done by
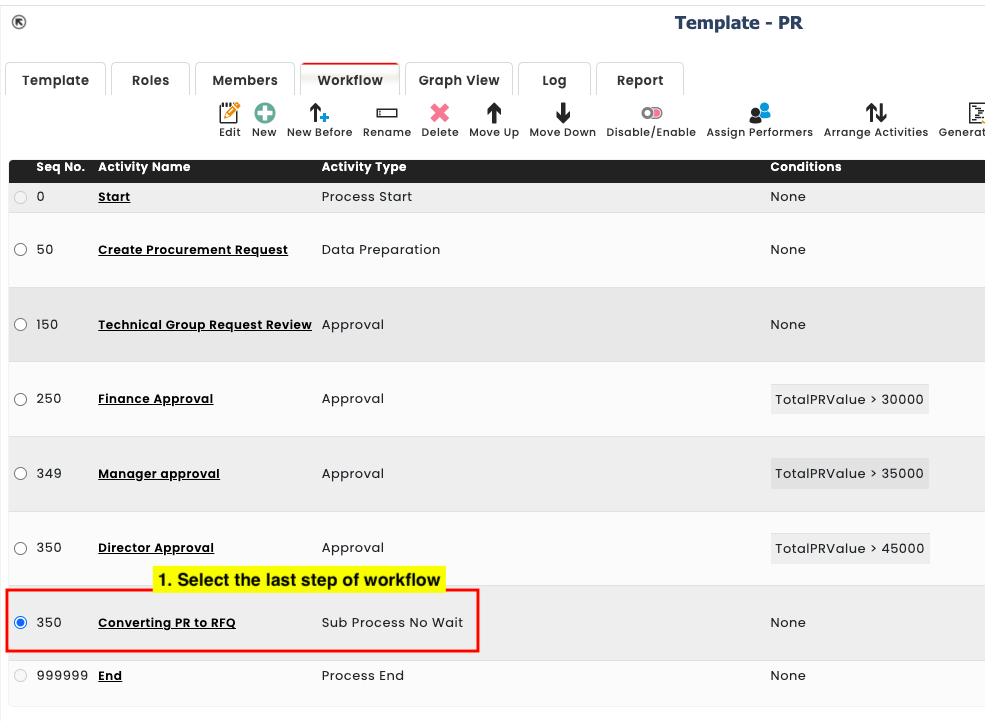
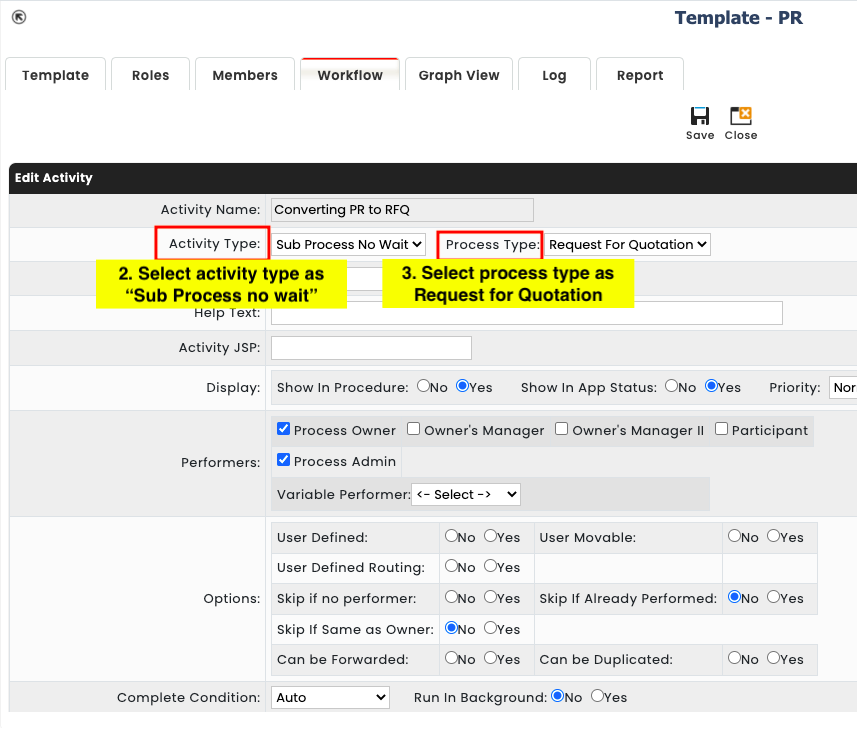
By doing so, this would automatically create an RFQ process when the workflow for the PR is completed.
2. Within the RFQ workflow, The last step of the workflow would need to be set to automatically create an Purchase Order process. This is done by
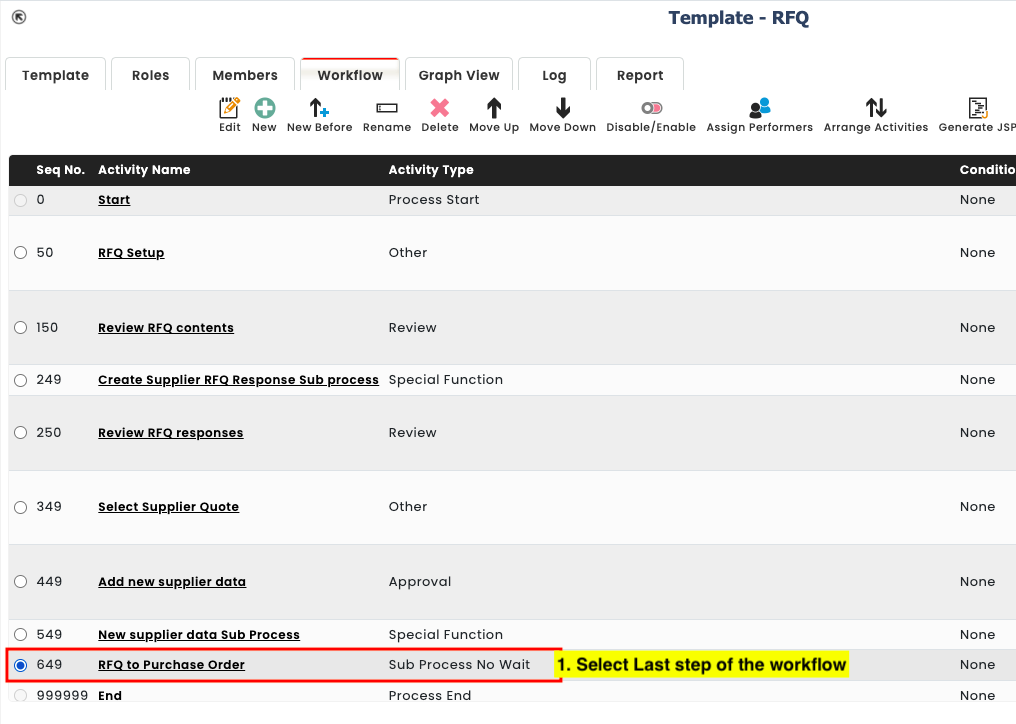
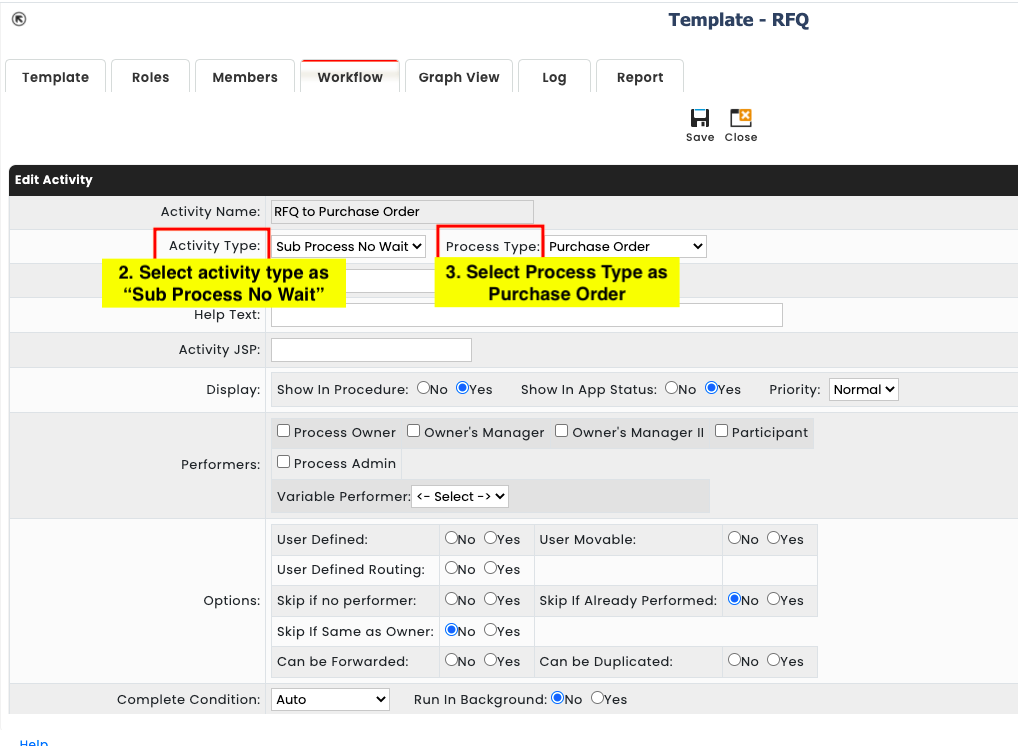
By doing so, this would automatically create an PO process when the workflow for the RFQ is completed.
We would not be required to do this for the PO since it would be the end of the entire Procure-to-pay process. This step is only necessary when we need to trigger the next process.