This section will contain the detailed instructions on how to install and Run Zflow on Azure VM’s and set up a loadbalancer to connect to them.
We will only Install Tomcat and Zflow on the VM’s and use an Azure mysql db as the database for these VMs.
We will also be setting up a loadbalancer to connect to the VM’s securely.
The versions used for this exercise are :
- Mysql – 5.7
- Tomcat – 9.XX
- Ubuntu – 20.04
Installing and running Zflow on Azure Virtual Machines
Setting up Azure VMs
The first step of the process is to set up VM’s on Azure in order to Install Zflow on them.
In Azure, click on create virtual machines and select the following details as shown in the diagram below.
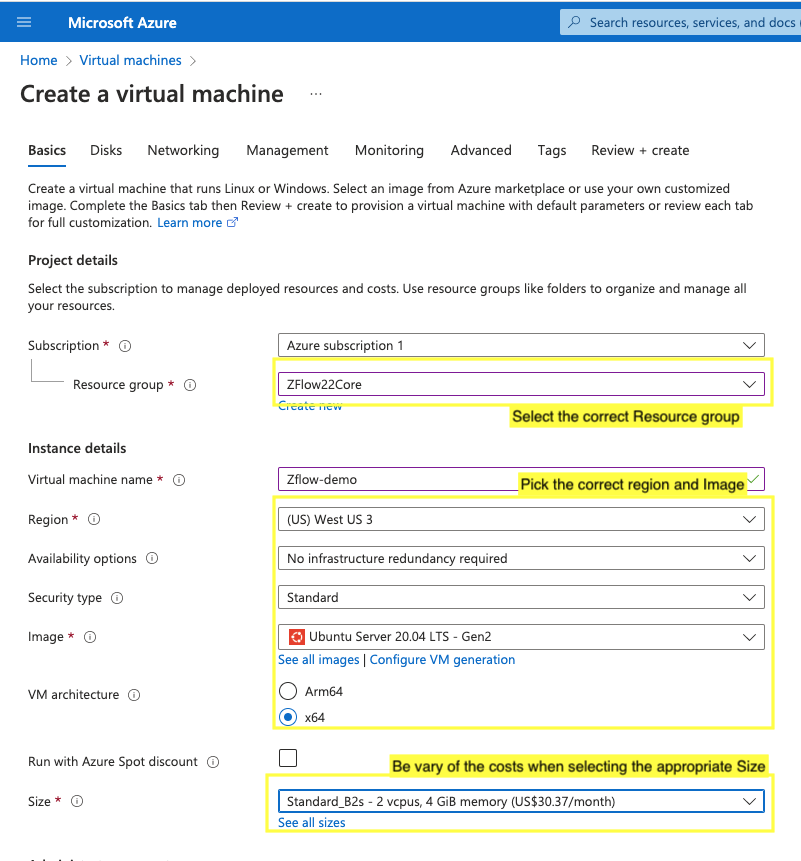
Make sure the Image selected is of Ubuntu Version 20.04 LTS- Gen2.
Also use a pre-generated ssh key to access your azure instances. Use below image for reference.
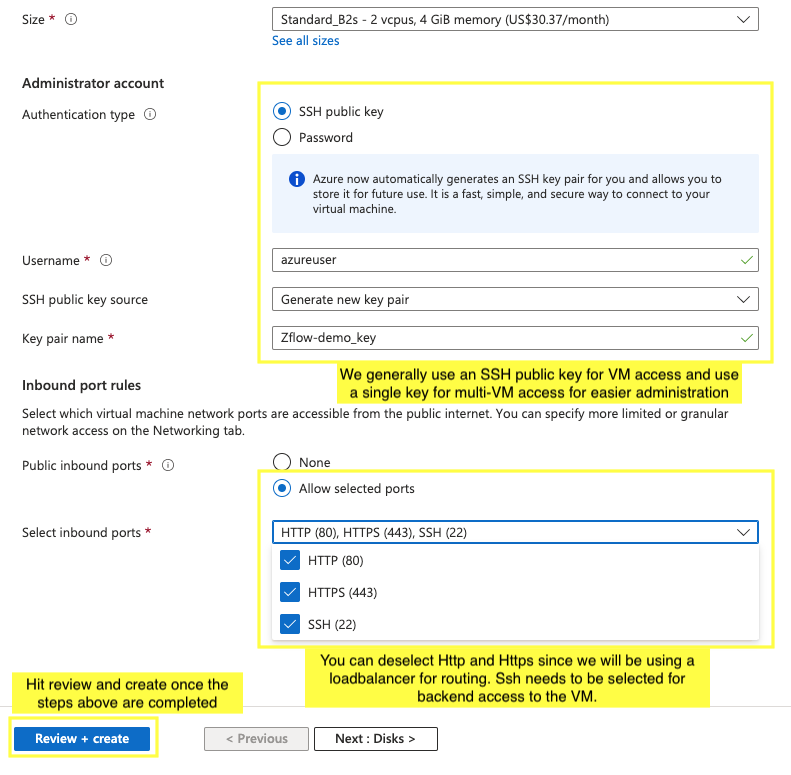
Once finished, hit review and create. It should take a minute for your VM’s to finish deployment and should be visible under the resources page. You can use the Public address of the VMs to access it via your system using your ssh key.
Installing Tomcat 9 and Zflow on Azure VMs
Important clarification that the Instructions below in the linked document will contain a section where you will be asked to enter the following mysql credentials in the ZFlowConfig.properties file.
-
DB_USER
-
DB_URL
-
DB_PASSWD
You will only have these credentials once you finish setting up the Azure Mysql db.
It is recommended to finish setup of the Azure mysql db before carrying out this step.
Creating Azure Mysql db
We will go through the process of creating the azure mysql db.
Under the Azure Database for MySQL servers section click on create and follow the below steps
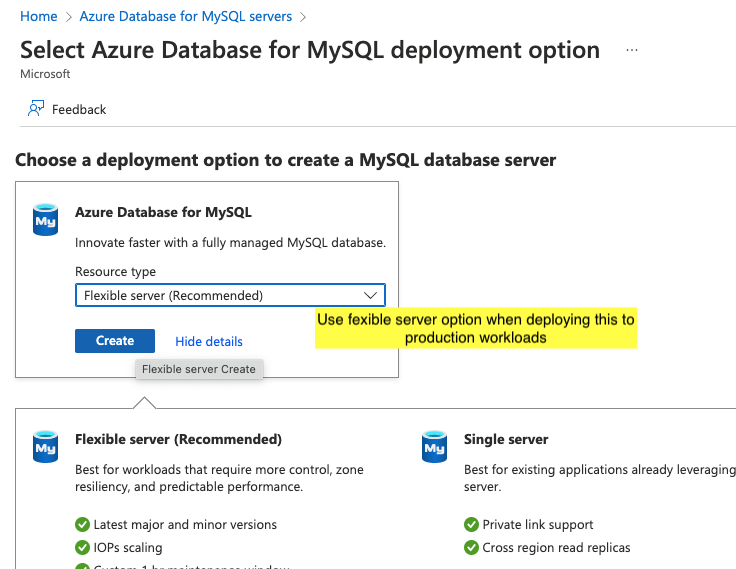
Use flexible server and enter the details as shown in the image below. Make sure to use sql version 5.7
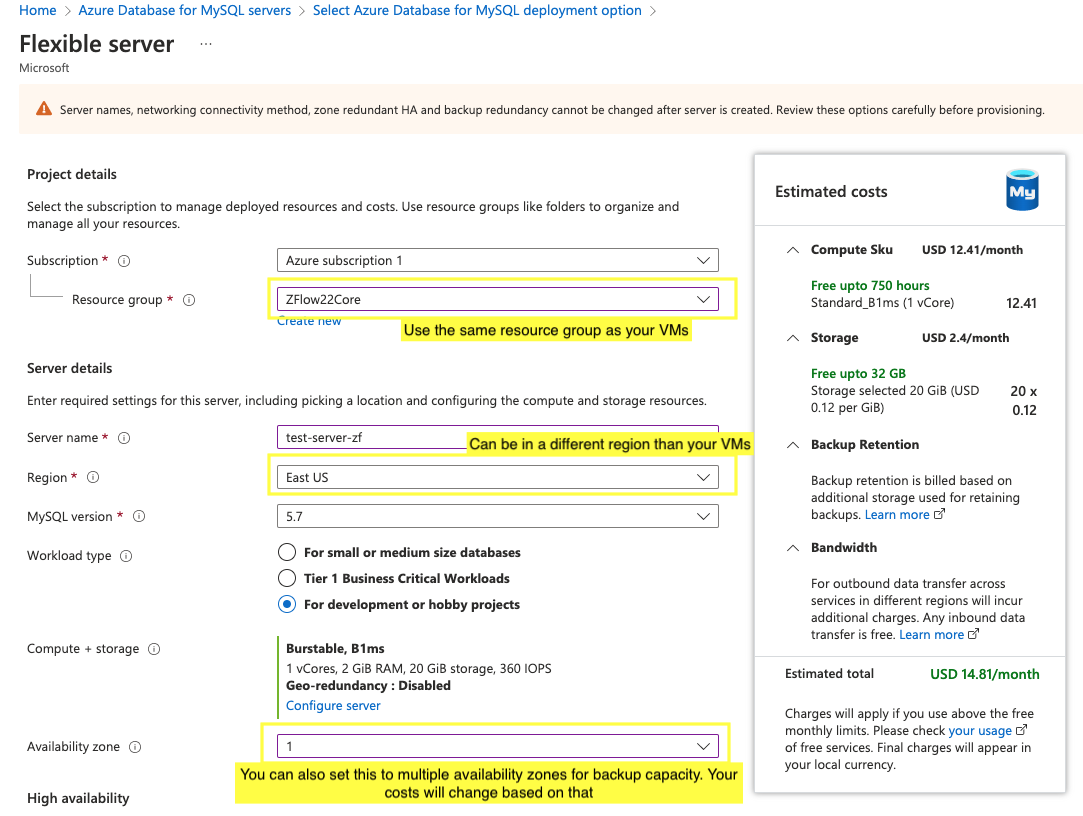
Also make sure to enter an admin username for the db and a secure password. You will be using this to access your Azure db.
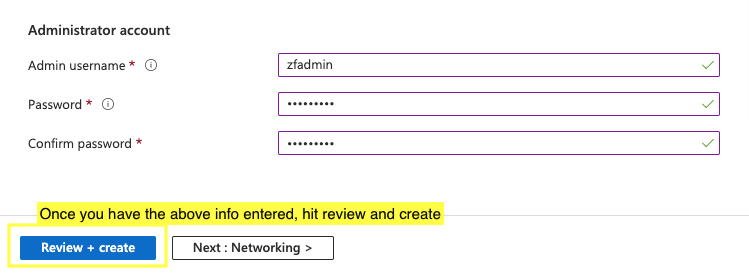
Before hitting the create button, you will need to set the networking rules as shown below
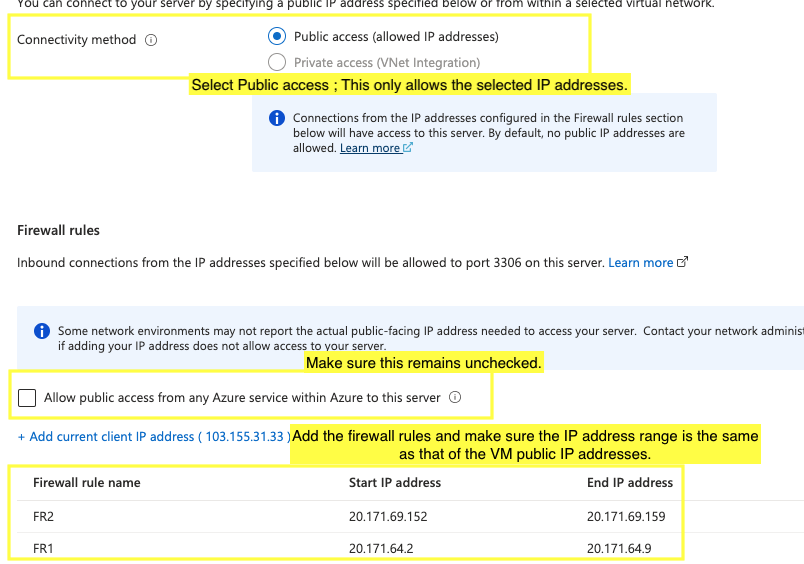
The IP addresses added under Firewall rules need to belong to the same range as the of the Public IP’s of the VMs.
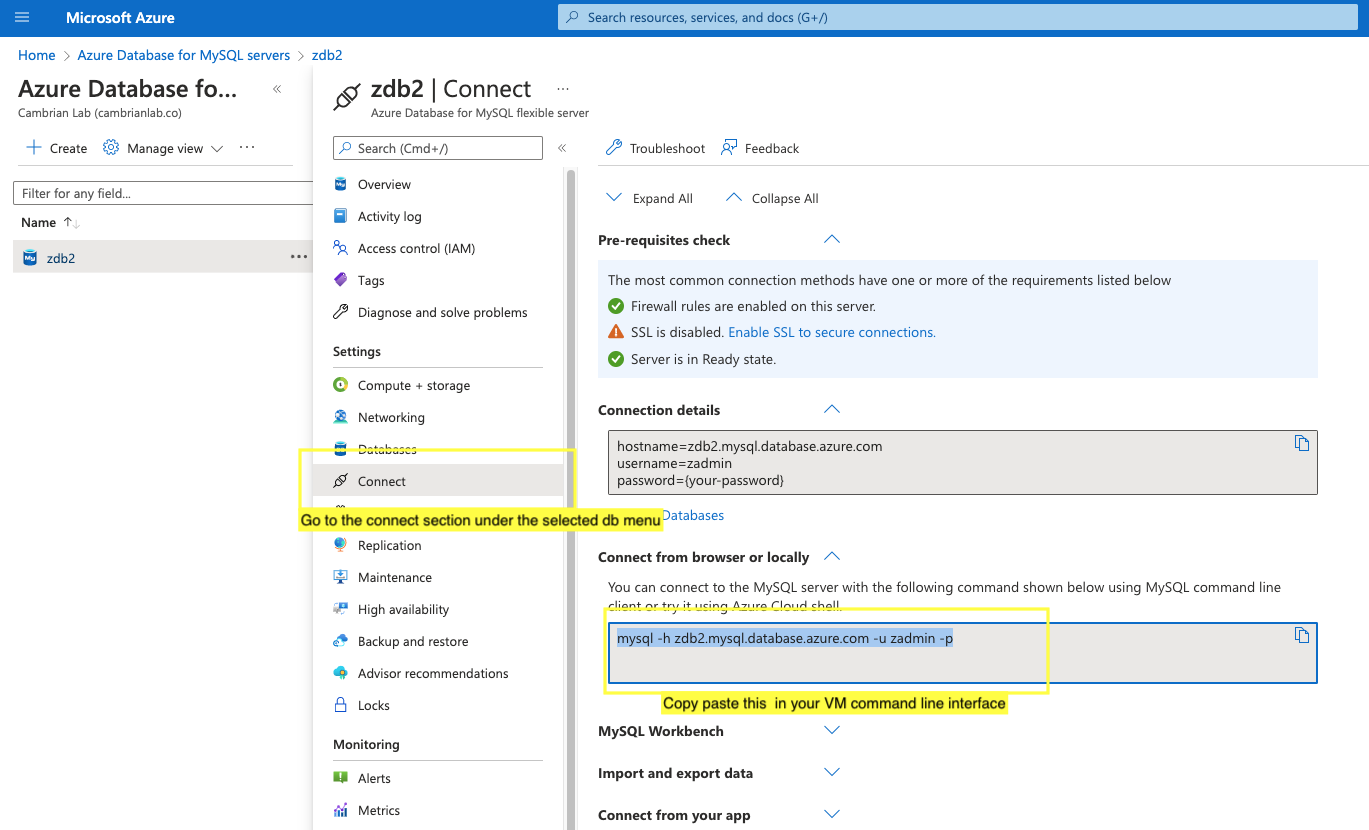
Once you hit create, it will take a few minutes to fully deploy. Once it has finished deploying, click on the db and navigate to the connect section. Copy paste the following onto the VM’s command line interface.
Also before you run the mysql connection command, you will need to run this below given command so that mysql server connections are enabled on your system. This is to be entered on the VM command line interface
sudo apt install mysql-server
You will first need to ssh your way into the VM and only then be able to run this command via the command line interface there.
Enter the password as prompted and you should be able to view all the databases.
Once you’re logged into the mysql db from the VM run the below commands to create a new user and a db.
mysql> CREATE USER 'userforzflowdatabase'@'localhost' IDENTIFIED BY 'password_for_zflowdbuser';
Make sure you give appropriate username and password in the above command and remember these as you will need them for configuring ZFlow. Then run the below commands
mysql> CREATE DATABASE databaseforzflow;
mysql> GRANT ALL PRIVILEGES ON databaseforzflow.* TO 'userforzflowdatabase'@'localhost';
mysql> FLUSH PRIVILEGES;
We will be using the above created new user and db during the zflow setup later on.
Creating the Load Balancer
We will be using the load Balancer to securely connect to the VMs and mask the original IPs of the VMs. This section is a bit lengthy and there will be mainly four sections to getting a load balancer running.
- Creating a Load balancer
- Setting up a FrontEnd IP
- Creating a backend Pool
- Adding a Health Probe
- Adding the Loadbalancer Rule
Creating a Load Balancer
Under the LoadBalancers section, hit the create button and use the following settings as shown below. Read the yellow highlighted section carefully before confirming the changes.
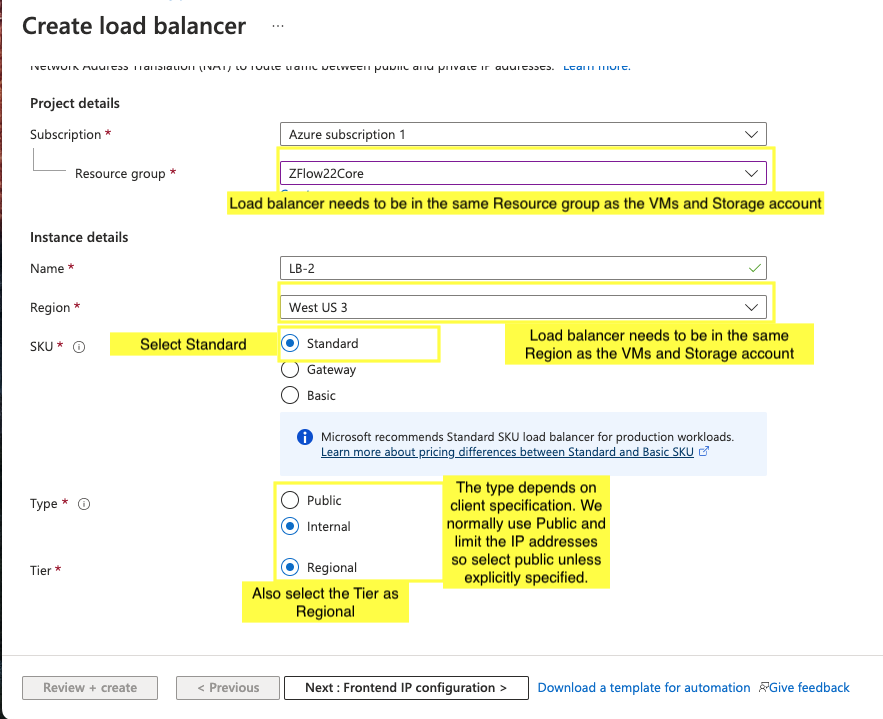
Make sure to use the Type as Public and not Internal like the Image above denotes. You can review and create this once you’ve filled in the initial page details. We will be going through the next Front end IP configuration in the next steps.
These steps can also be performed once the Loadbalancer is created so you can go ahead and hit review and create.
Setting up a FrontEnd IP
Click on the deployed loadbalancer and navigate to the FrontEnd IP section as shown below
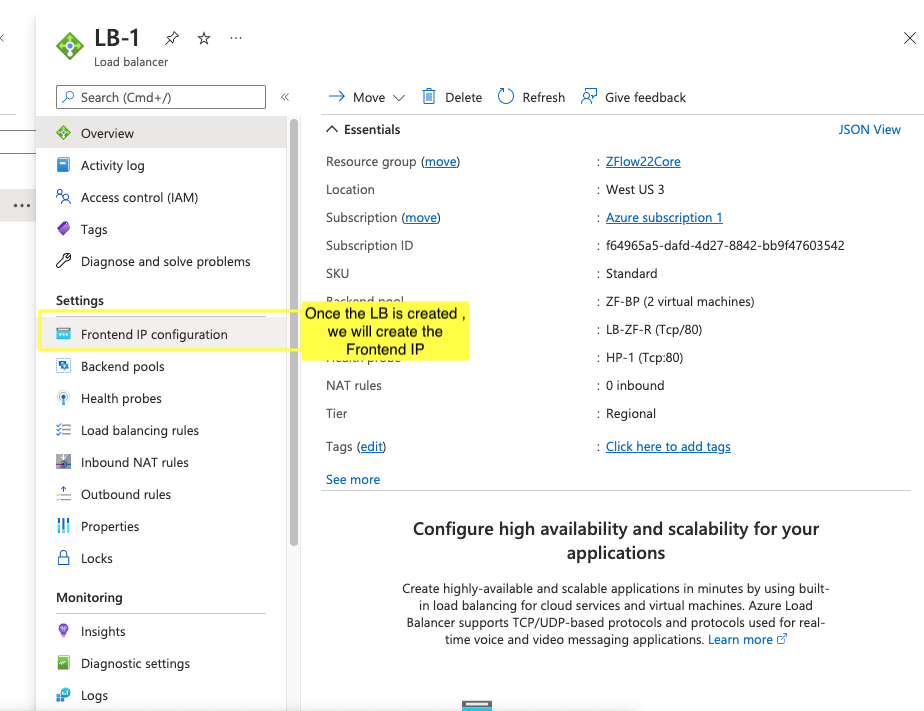
Create a new FrontEnd IP by following the settings as shown below. You will also be needed to create a new Public IP address here.
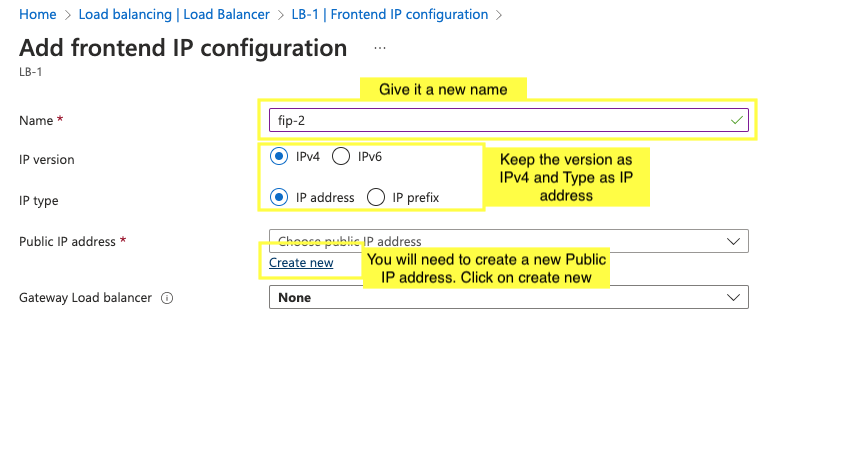
After clicking on Create new Public IP address, we will enter the details as shown below

Once you’re finished with the details, hit create and the deployment will take a minute or two to finish.
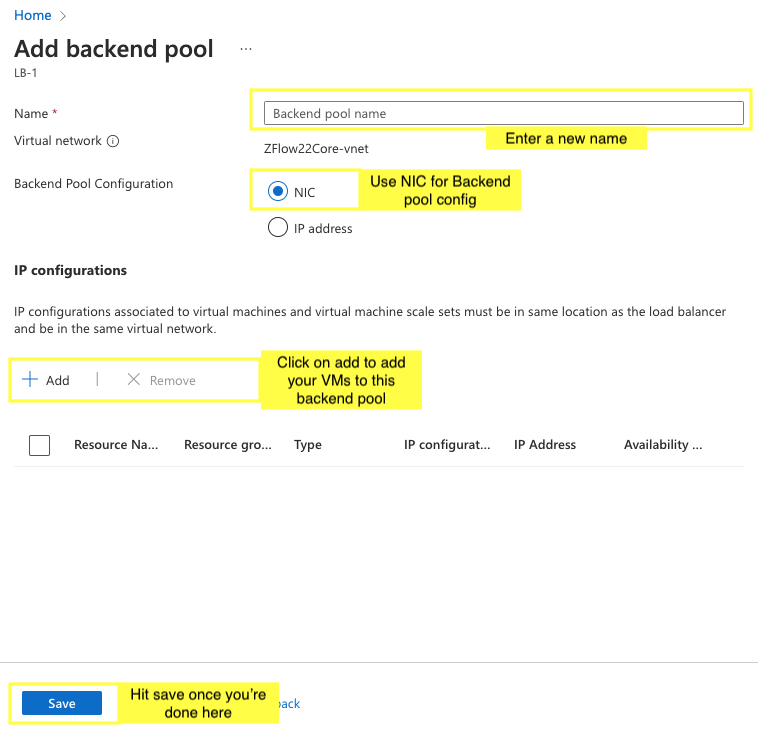
Creating the Backend Pool
The Backend pool consists of the group of VMs that you will be tagging the Loadbalancer to which will inturn redirect the users to the VMs.
Navigate to the Backend pool section and hit create. Follow the settings given below
Once it is deployed you should be able to see your VMs in the backend pool.
Adding the Health Probe
Create a health probe and set the Protocol to TCP and the port as 80.
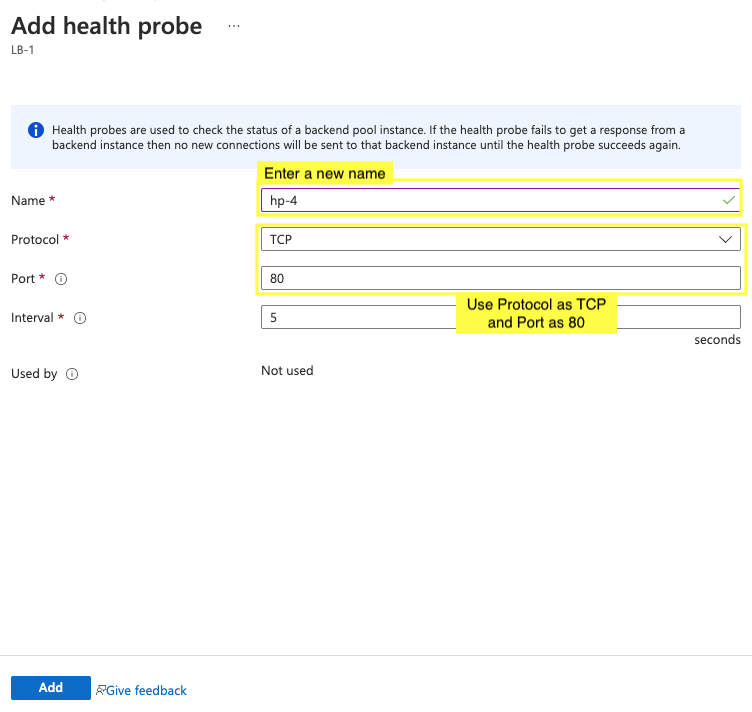
Hit add once you’ve finished and the deployment should be done in a few seconds.
Adding the Load Balancing Rule
This is the most important step of the process. We will be using all the above steps we did and use them in creating the Rule.
Navigate to the Load Balancing Rule section and create a new one. Use the IP Version as IPv4. Read the highlighted parts carefully before filling in the data.
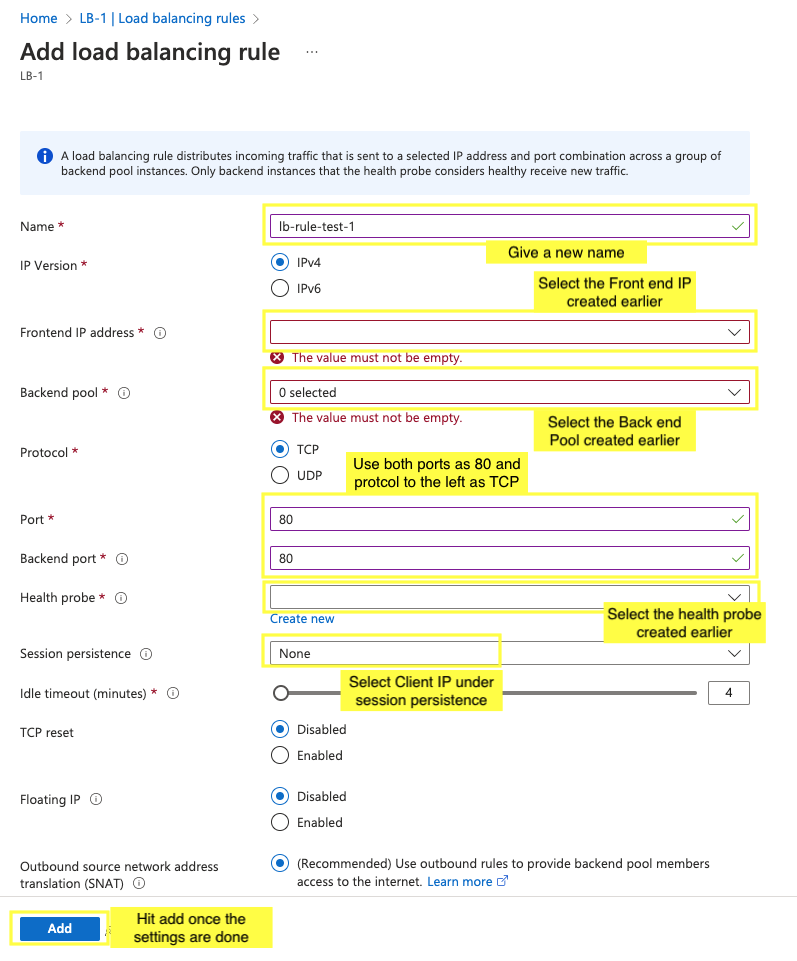
Once you’ve filled in the data based on the steps done earlier, go ahead and add the rule. The deployment should take a few minutes to finish.
Once finished, navigate back to the FrontEnd IP section.
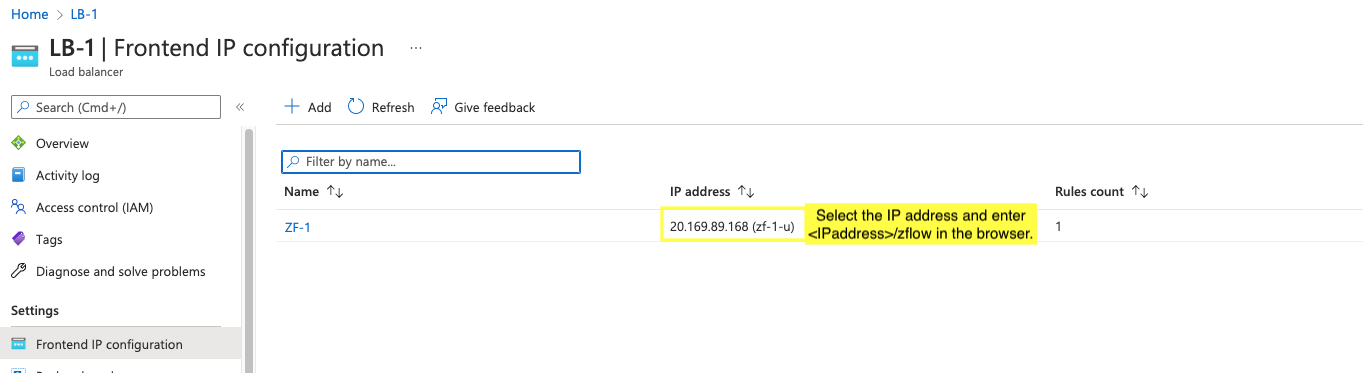
Here, you can select the IP address as shown in the diagram below and suffix /zflow to it. You basically enter <IPaddress>/zflow into your browser window and you should be able to access the zflow application while the original IP of the VM is masked.
Setting up the Storage Account
We will also be setting up a common storage account that will be used as a centralised repository for all the files that will be uploaded via Zflow.
To set this up, go to Storage accounts in aws and click on Create.
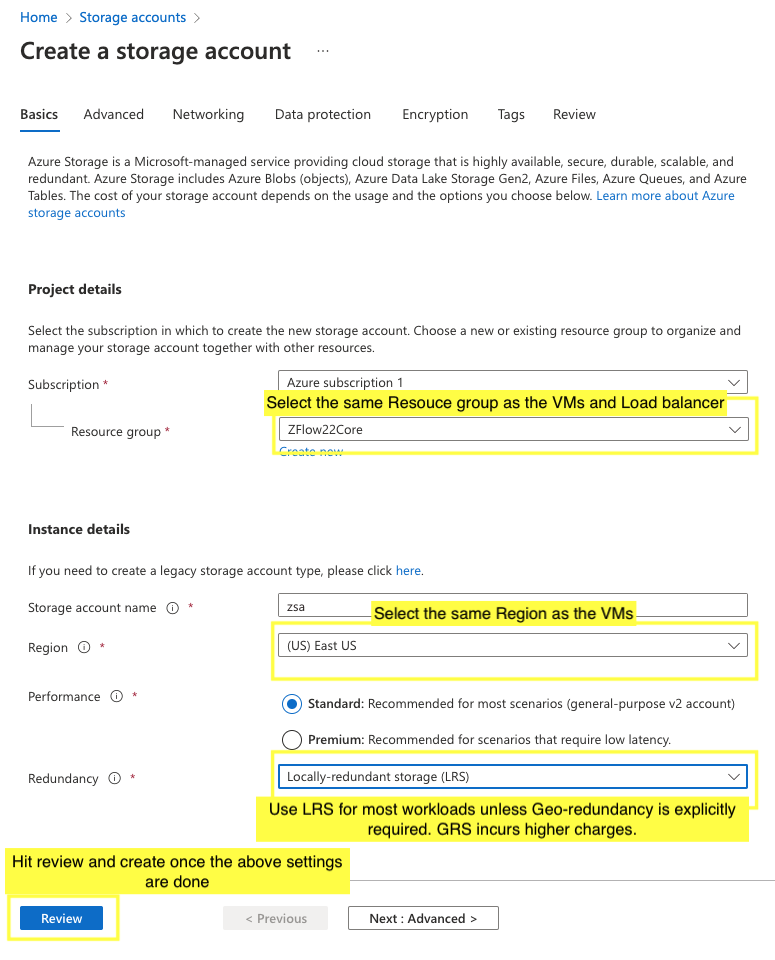
Use the following settings as mentioned in the image above and create the storage account.
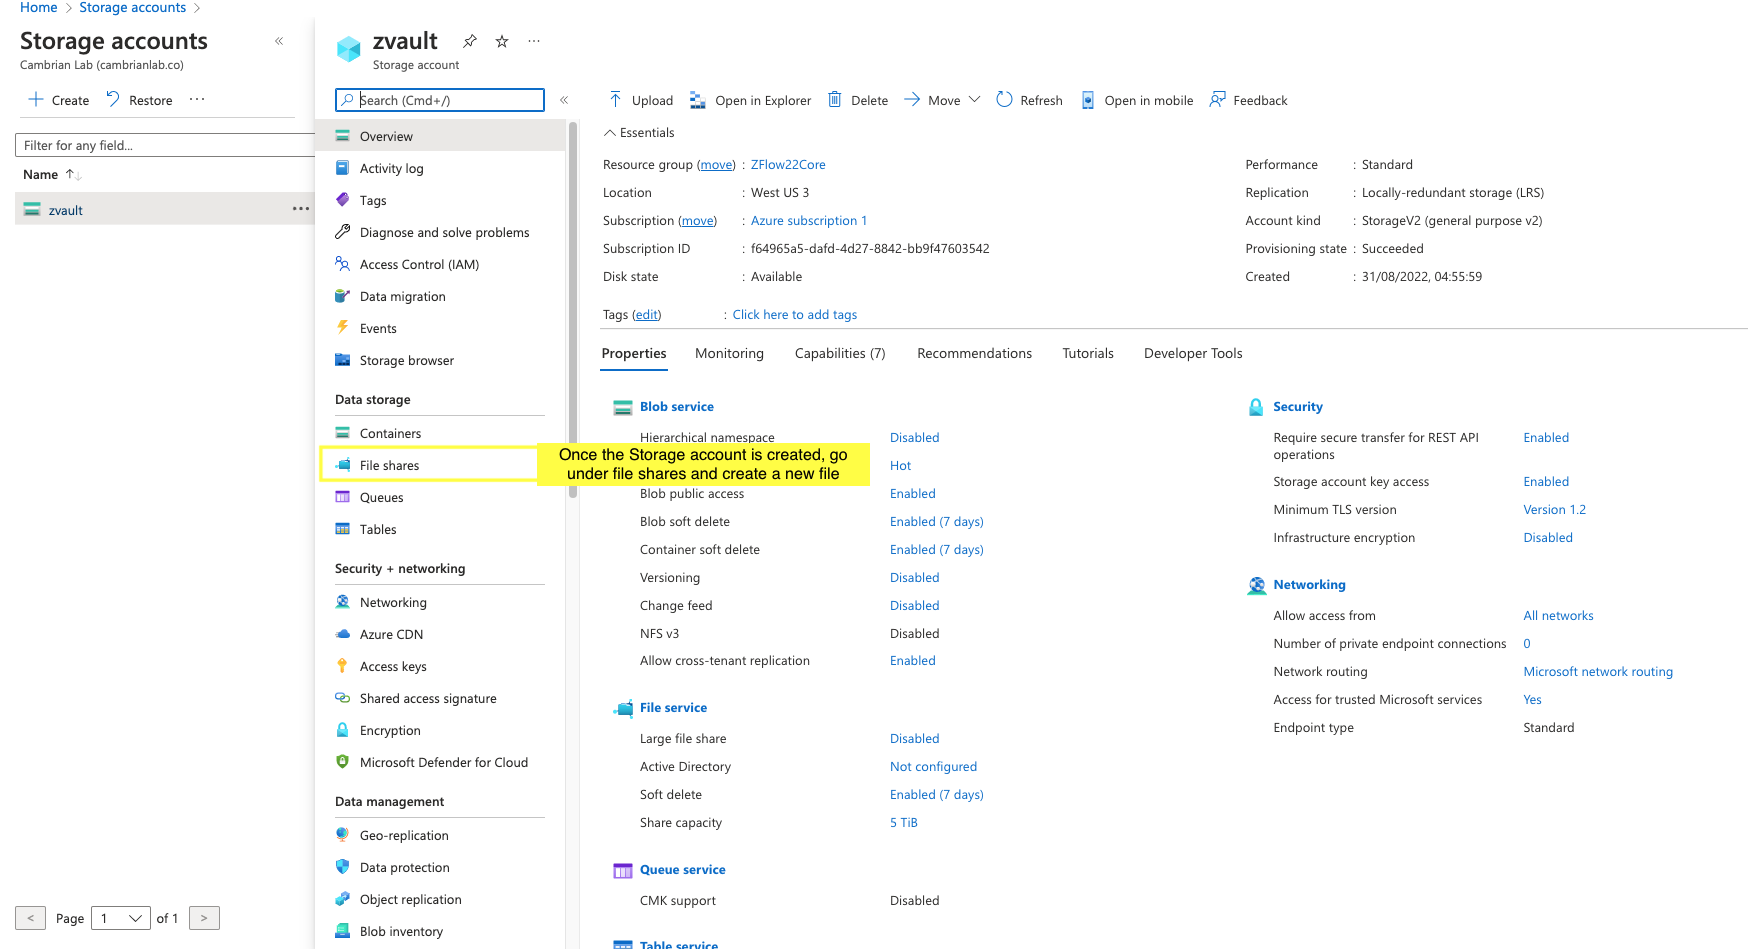
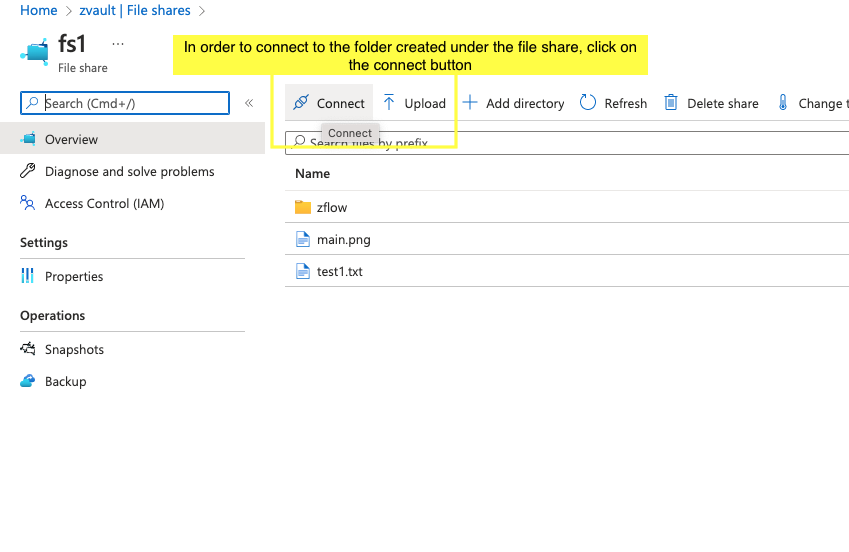
Once this is fully deployed, go to File shares under your Storage account and create the new file. This new file needs to be under File shares and not any of the other Data storage types. This is what allows us to have a common repository for all of our VMs.
Once your new file share is created, click on it and navigate to the connect section as shown in the image below
Once here, Go under Linux and copy paste the script into the command line terminal of your VM.
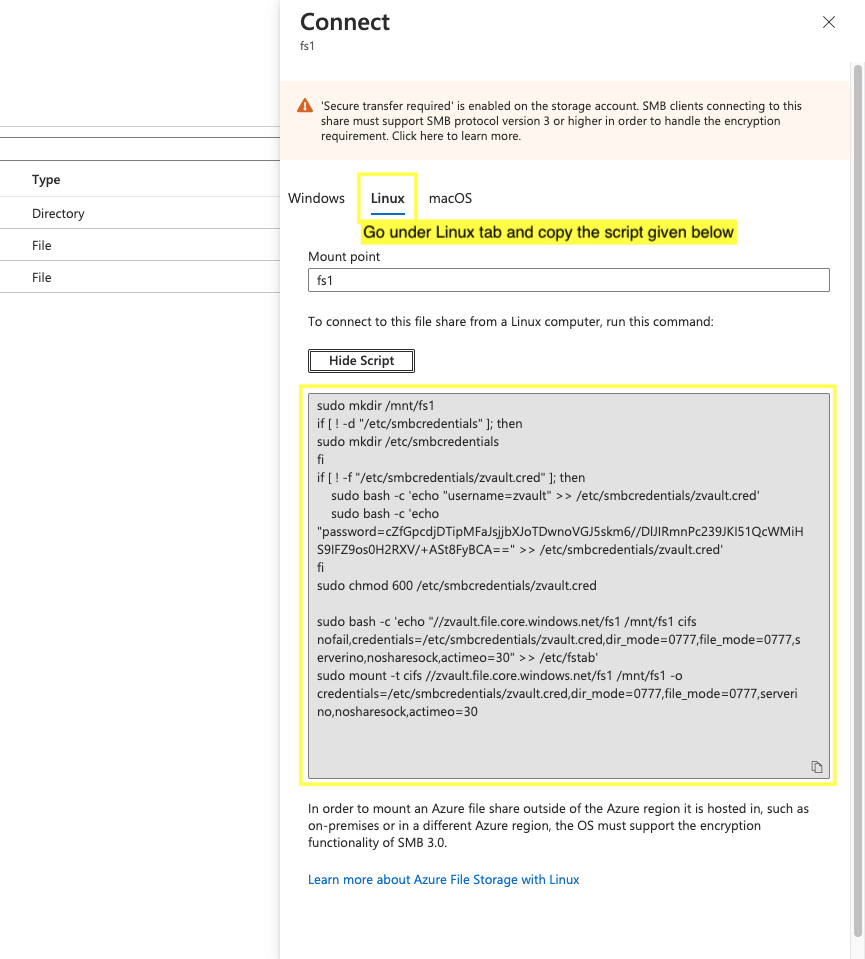
You first need to ssh into your VM and then copy paste this script into the command line terminal to run it. Once finished, you simply run the command
ls /mnt/<filename>

ls/mnt/testfile
In order to see the contents of the File share.
You can also perform all the functions you could do on the command line within the file share.