ZFlow can be easily installed on AWS Linux 2 using the instructions below. We are assuming that your organization or you have an AWS account and are comfortable with AWS services in general, and especially EC2.
Launching AWS Linux 2 Instance
The first step is to login into your AWS account and from the console panel get to the EC2 Dashboard. From the


Install Java 8
Once you are able to access the above AWS instance using ssh you can start the process of installing pre-requisites. If you are new to EC2 you can learn more about how to access EC2 instances using ssh in the following AWS user guide.
You can use the following command to install Java 8 on AWS Linux 2 instance
sudo yum install java-1.8.0-openjdk
You can check active java version using the following command
java -version
You should see something like below
![]()
Install Tomcat
There are a couple of options for installing tomcat 8.5
Option#1: Use Tomcat 9 from AWS extras repo
You can list the extra packages (you will see tomcat8 versions):
amazon-linux-extras list
You can install tomcat9 with the following command
sudo amazon-linux-extras install tomcat9
You can start tomcat service with the following command
sudo systemctl start tomcat
You can use the following command to enable tomcat to start automatically when the server boots up
sudo systemctl enable tomcat
You can look at the tomcat log using the following command
journalctl -f -u tomcat
The webapps directory of tomcat is usually located under
/var/lib/tomcat
Unfortunately, the installation process does not create the tomcat webapp (ROOT) so there is no index file under /var/lib/tomcat/webapps/ROOT/ to clearly show that tomcat is running. You can of course create your own index file and add it to the /var/lib/tomcat/webapps/ROOT/ directory. You can do this by creating index.html with the following HTML
You can also download the index.html file and place it under /var/lib/tomcat/webapps/ROOT/
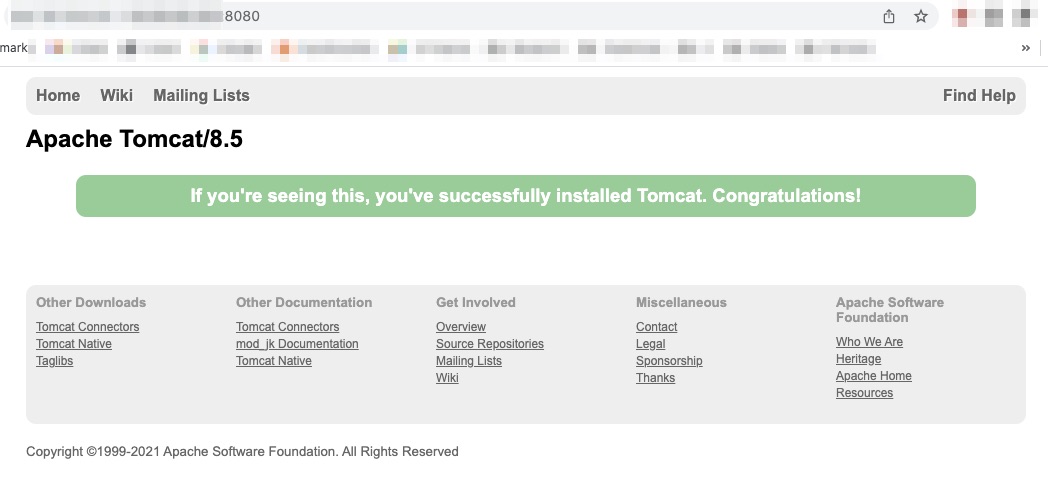
Once tomcat is working you should see a screen like below when http://your_aws_instance_public_ip_number:8080 is entered in the browser URL
Use the command below to stop tomcat
sudo systemctl stop tomcat
Option#2: Download from tomcat repository and install
The second option is to download tomcat from apache tomcat repository and installing it.
You follow the steps in the following post to install Tomcat manually
How to install Apache Tomcat 8 on Ubuntu
Install MySQL 5.7
Since AWS Linux 2 does not have MySQL repositories the first step is to add the source repo using the command below
sudo rpm -Uvh https://dev.mysql.com/get/mysql57-community-release-el7-11.noarch.rpm
Run this command before you run the below command to install mysql-server
sudo rpm --import https://repo.mysql.com/RPM-GPG-KEY-mysql-2022
Once the repo is installed use the command below to install MySQL community server
sudo yum install mysql-community-server
To set MySQL server to start on boot using the following command
sudo systemctl enable mysqld
Start MySQL server using the command below
sudo systemctl start mysqld
By default MySQL 5.7 installation generates a temporary password. To find the password use the following command
sudo grep "password" /var/log/mysqld.log
Take a note of the above password since you will use that password in the step below.
Use the following command to reset the password and secure the installation.
sudo mysql_secure_installation
Remember the new password as you will need it in the next step. Learn more about MySQL Secure Installation.
Once MySQL is up and running the first step is to create a database user and database for zflow. You can login as MySQL root user to create the user and database with the following commands
mysql -u root -p
Once connected to MySQL create the user with the following command. Come up with appropriate names for the following for your ZFlow installation and keep them handy
- userforzflowdatabase
- password_for_zflowdbuser
- databaseforzflow
mysql> CREATE USER 'userforzflowdatabase'@'localhost' IDENTIFIED BY 'password_for_zflowdbuser';
Make sure you give appropriate username and password in the above command and remember these as you will need them for configuring ZFlow.
mysql> CREATE DATABASE databaseforzflow;
mysql> GRANT ALL PRIVILEGES ON databaseforzflow.* TO 'userforzflowdatabase'@'localhost';
mysql> FLUSH PRIVILEGES;
Install ZFlow
Go to the home directory of ec2-user and download ZFlow with the commands below
[ec2-user@ip-******** ~]$ cd $HOME
Please send us an email or contact us for ZFlow distribution. ZFlow distribution is a tar file (zflow.tar.gz) that you can unzip and untar using the commands below
[ec2-user@ip-******** ~]$ gunzip zflow.tar.gz
[ec2-user@ip-******** ~]$ tar -xvf zflow.tar
You should have the zflow directory with related application files listed
[ec2-user@ip-******** ~]$ ls
working  zflow
Move zflow directory to the webapps directory
[ec2-user@ip-******** ~]$ sudo mv zflow /var/lib/tomcat/webapps/
Change directory to webapps folder
[ec2-user@ip-******** ~]$ cd /var/lib/tomcat/webapps/
Change group and user ownership of zflow to tomcat
[ec2-user@ip-******** ~]$ sudo chown -R tomcat:tomcat zflow
ZFlow Configuration Properties
ZFlow configuration file is in the folder below
[ec2-user@ip-******** ~]$ cd /var/lib/tomcat/webapps/zflow/WEB-INF/classes/cfg
Use an editor (like vi or vim) to edit database configuration properties in the Configuration file
[ec2-user@ip-******** ~]$ sudo vi ZFlowConfig.properties
Change the values of the database config properties as shown below. Use the actual names of the database user, database name and database password that you created in the MySQL section. Save changes to the file
DB_USER=userforzflowdatabase

DB_URL=jdbc:mysql://localhost:3306/databaseforzflow

DB_PASSWD=password_for_zflowdbuser
Change LINK_BASE to IP number or DNS name of the tomcat server (If you are using load balancer in front, you should use the load balancer information
LINK_BASE=DNSName(or)IP:port/zflow
Depending the on the configuration you may route all the requests (using IP redirect and other options) using port 443 (https, in which case it will be
LINK_BASE=https://DNSName/zflow
ZFlow Install Properties
Since this in an initial install we should set the appropriate install properties to create the database tables as well as load initial data. Install properties file is in the folder below
[ec2-user@ip-******** ~]$ cd /var/lib/tomcat/webapps/zflow/WEB-INF/classes/inst
Use an editor (like vi or vim) to edit install properties file
[ec2-user@ip-******** ~]$ sudo vi install.properties
Set the following install properties to true
INSTALL=true
LOAD_SYS_DATA=true
Once this step is finished you can go back to the home directory and start tomcat server
sudo systemctl start tomcat
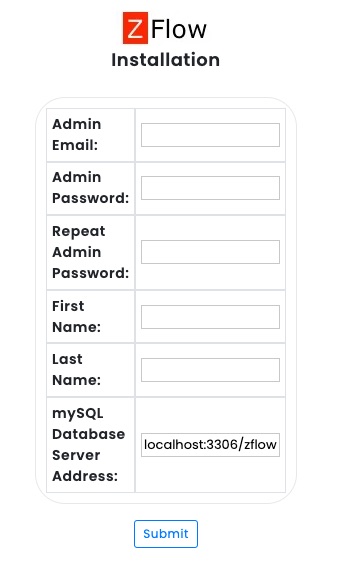
ZFlow should be running now. You can go to http://public_ip_of_your_ec2_instance:8080/zflow to complete the installation.
Make sure the inbound rules are properly set up in the security group so that 8080 port is reachable. You can also set an IP table rule to route all (http requests – port 80) are forwarded to 8080 which is the default port of tomcat.